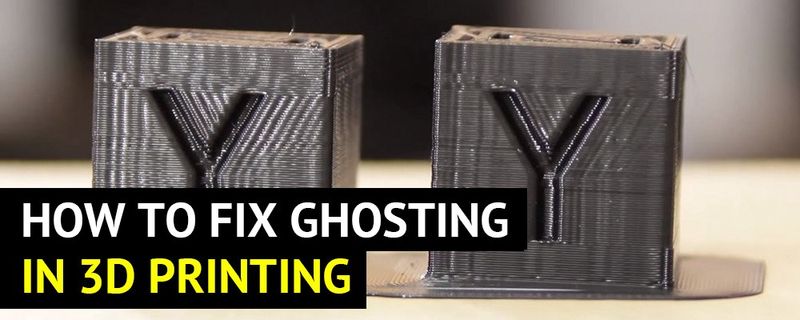
Ghosting, aka ringing and rippling, is a 3D printing defect in FDM/FFF technologies, most noticeable on flat vertical surfaces. It can be triggered by mechanical fluctuations in the machine’s structure and when the printing head changes the direction of movement.
Here’s our step-by-step walkthrough on how to eliminate this issue. Stay with us to find out more about printing without ghosting.
The best first step to fix issues with a mechanical nature is checking and tightening the screw joints. Perhaps, the screws were not tightened enough during assembly, or loosened during operation. Excessive play and loosening of the overall printer’s structure affect print quality, so it’s best to exclude loose connections before adjustments.
It is advisable to use a torque wrench for tightening the screws. But in a household setting where only conventional tools are at hand, it is simply worth remembering that excessive force will damage the threading, grooves or the screw itself, depending on which component is more vulnerable.
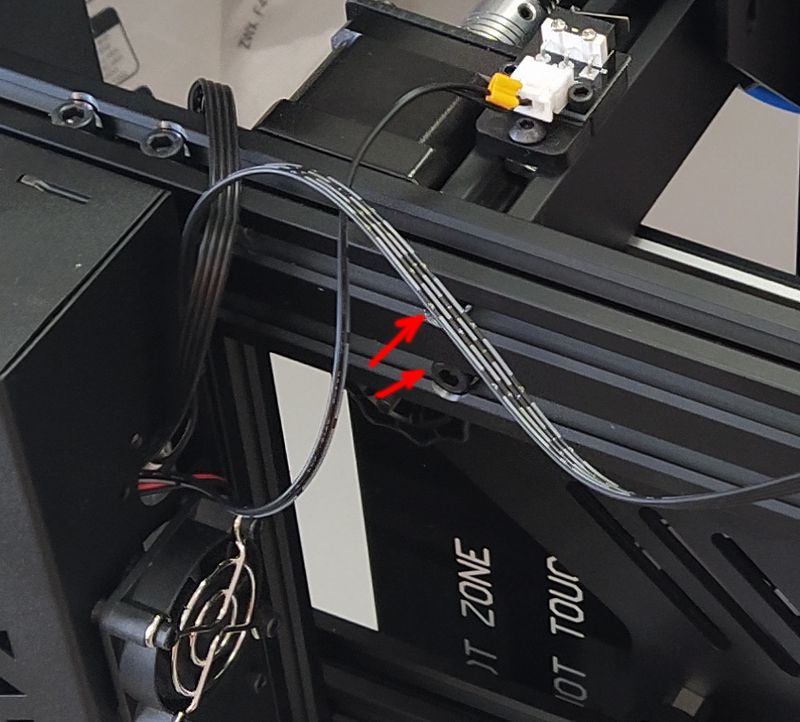
For example, in the case of a printer based on structural profiles, first of all you’ll need to tighten the screws joining the profiles themselves. Here is the connection of the Z-axis rails to the base on the Longer LK5 Pro 3D printer.
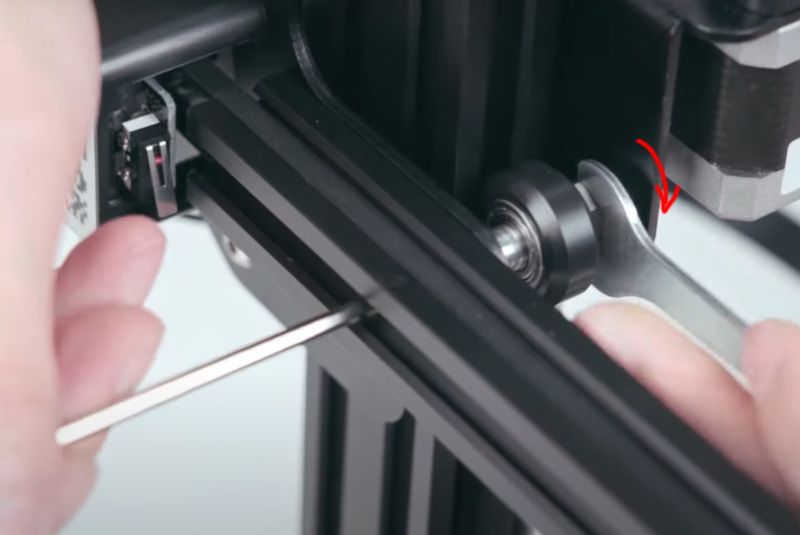
Fastening of the carriage plates to the profile is also an important step. The procedure for tightening the screws in this particular case is cumbersome: you need to disconnect the X-axis profile from the Z-axis rails. A video tutorial for this procedure on the Ender-3 is available on Creality’s official channel.
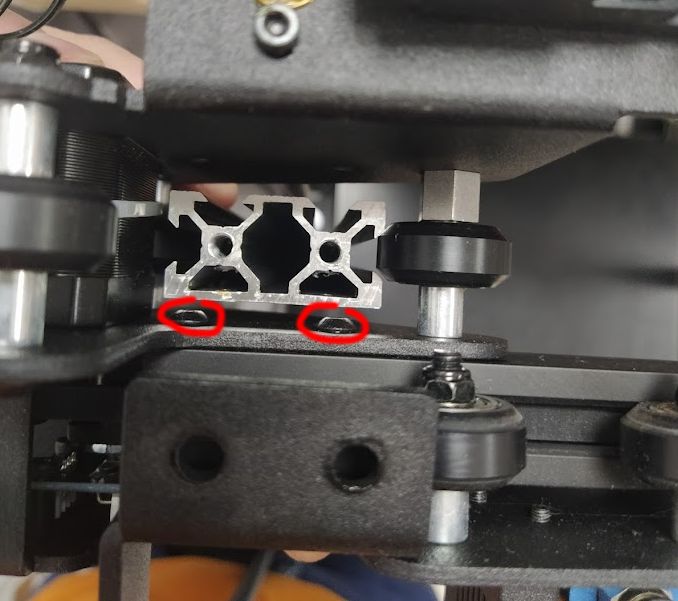
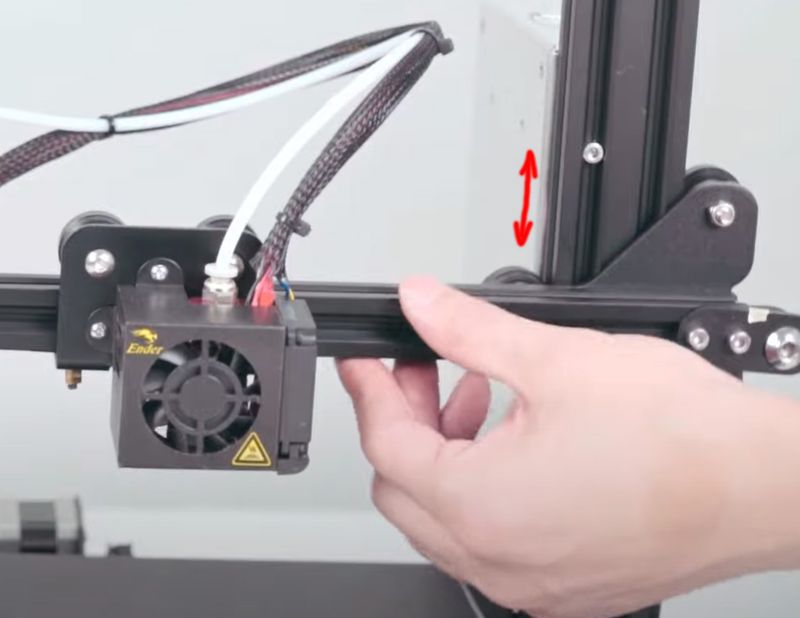
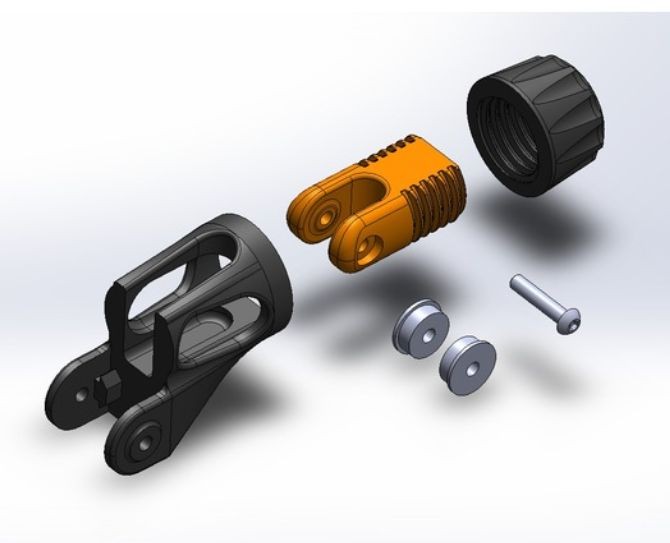
It is also necessary to check the state of the moving parts: the motion along all of the axes should be smooth, void of chatter and extraneous sounds. If the printer carriages are equipped with rollers, check just how tight they are. When the carriage’s or the bed’s movement is hampered for any reason, it usually means that the adjusting roller is overtightened, and it is necessary to loosen it. If the rollers diverge from the guide profile, you need to increase the pressure.
Credit: Creality / YouTube
For example, if the X-axis guide moves up and down easily, this may be the reason for insufficient pressure on the rollers of the Z-axis guide.
Credit: Creality / YouTube
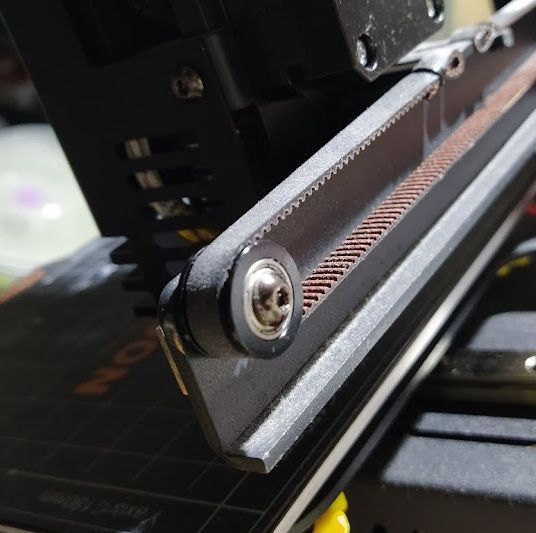
Increasing the pressure of the eccentric roller
The belt tensioning procedure varies from printer to printer. The easiest option is when the manufacturer has provided for tension adjustment without the use of tools.
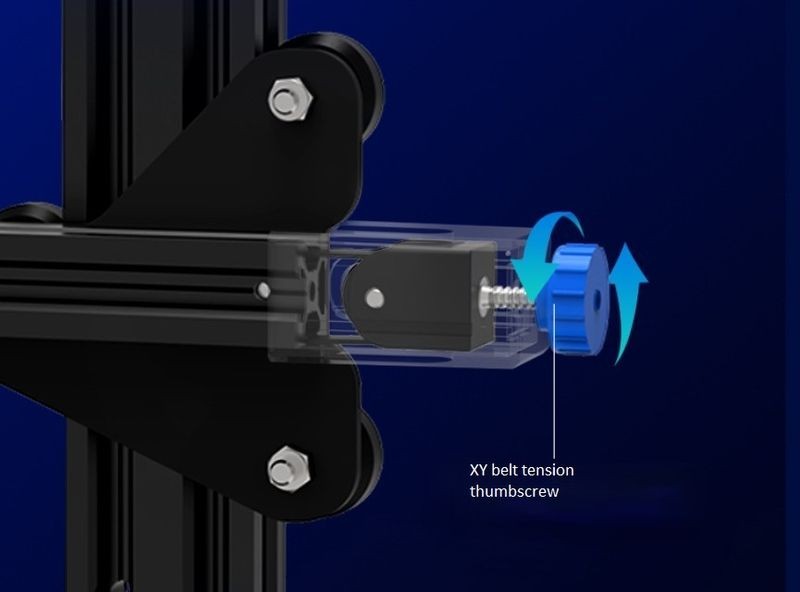
Credit: Creality.com
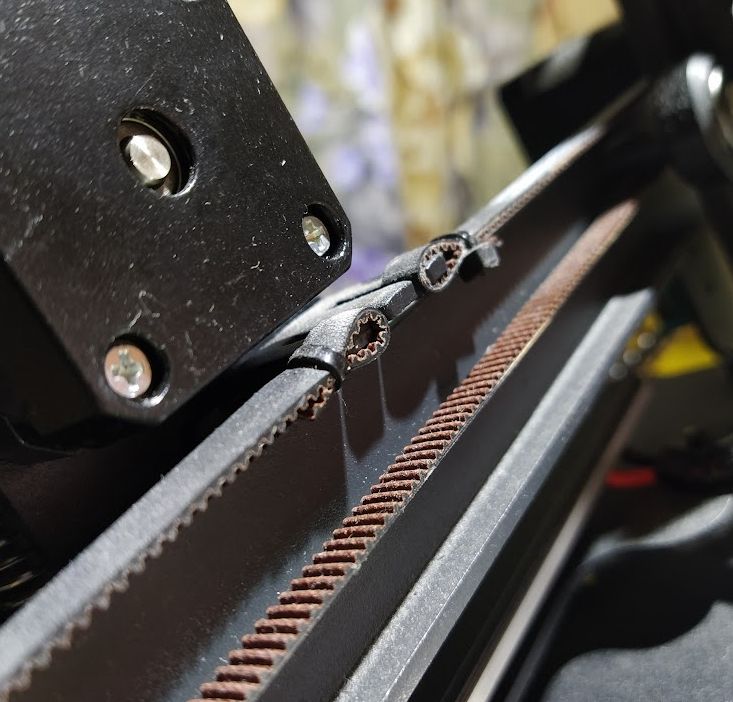
Belt tension adjustment of the X-axis on the Creality Ender-3 v2
A more common and less convenient option is when the belt is tensioned by moving the roller mount. Just loosen the screws, move the joint manually and tighten the mount while holding it.
Y-axis belt tension adjustment on the Creality Ender-3 Pro. Loosen the screws, move the roller mount and fix it in place.
Credit: Creality.com
You can also find community-developed screw belt tensioners for the most popular models of 3D printers.
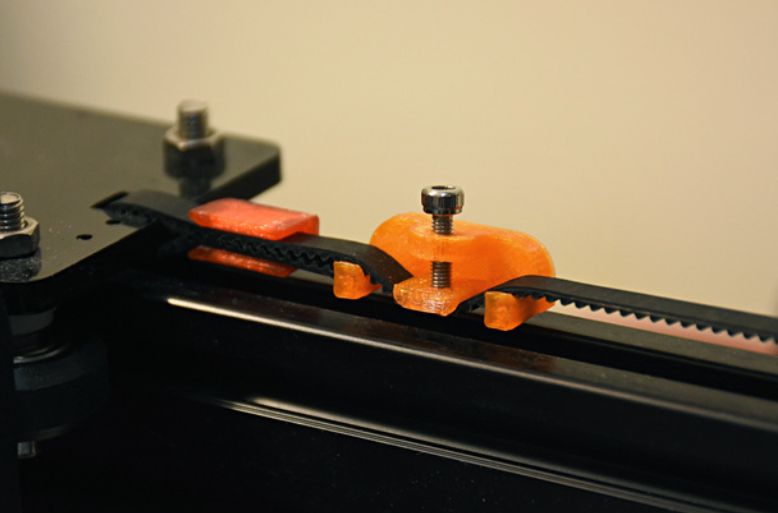
Y-axis belt tensioner model for the Creality Ender-3
Credit: thingiverse.com
There are other ways to get more tension on the belts, for example, by displacing the motors, as in the case with the FlyingBear Reborn. Finally, a number of low-budget 3D printers don’t have a belt tensioning option whatsoever. One example is the Kingroon KP3S. The belt is rigidly fixed with cable ties while the motor and the roller have no options for adjusting their position.
No belt tension adjustment. The roller is fixed in a single position.
In the case with the KP3S, the belt tension can be changed with the following procedure: remove the belt from one of the mounts, mark or photograph the current configuration just in case, remove the zip-tie using wire cutters and move the loop by one or two belt teeth.
Zip tie belt fixtures on the Kingroon KP3S
Another class of tensioners is those installed on the straight portion of the belt. They come in rigid, adjustable and spring-based form. These modifications do not fit all of the machines, for they increase belt play and may cut off some of the print area. Spring tensioners are not the best choice, since they can generate additional play and oscillation when changing direction resulting in belt tension fluctuations.
An example of a 3D printed adjustable belt tensioner
Credit: thingiverse.com
It is difficult to give a clear recommendation on the exact belt tension for every 3D printer out there, so usually, the following rule applies: if you pluck a correctly tensioned belt on the stretched section, it should swing a little, but without buzzing like a string.
Excessive belt tension can lead to increased belt wear, deformation of the printer’s components, and another type of defect - small rippling over the entire area of the flat vertical surfaces.
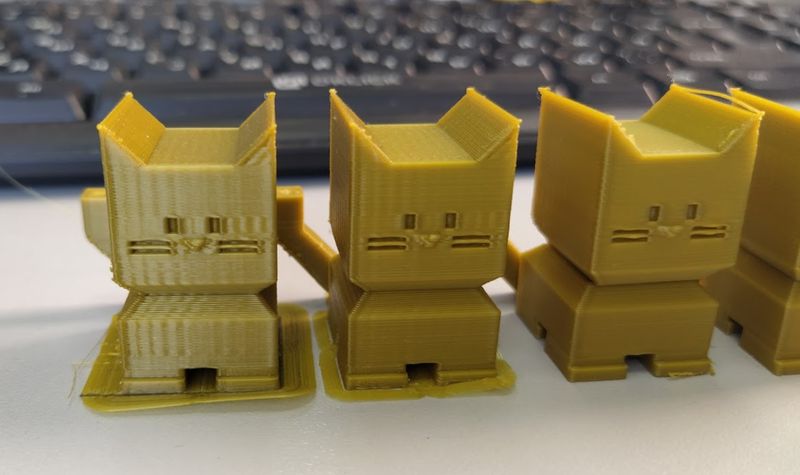
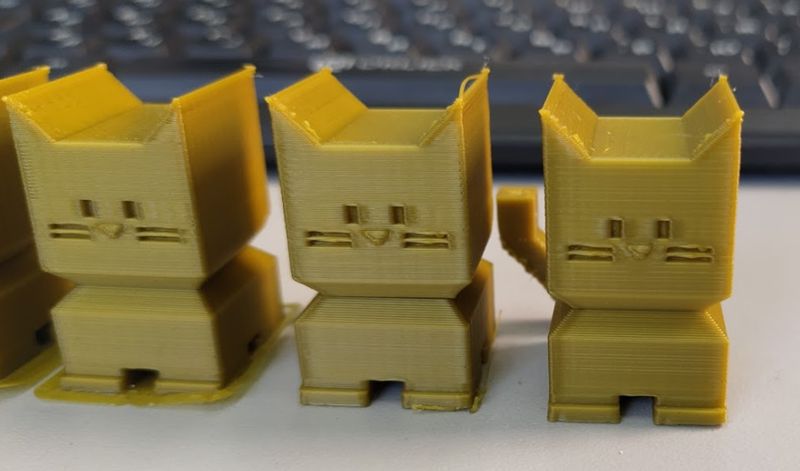
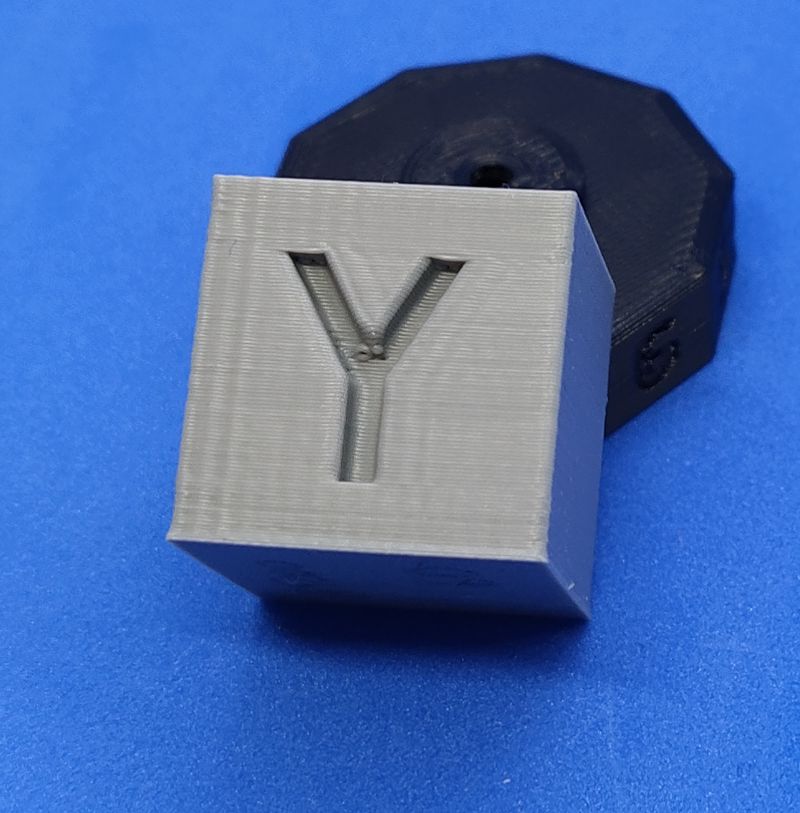
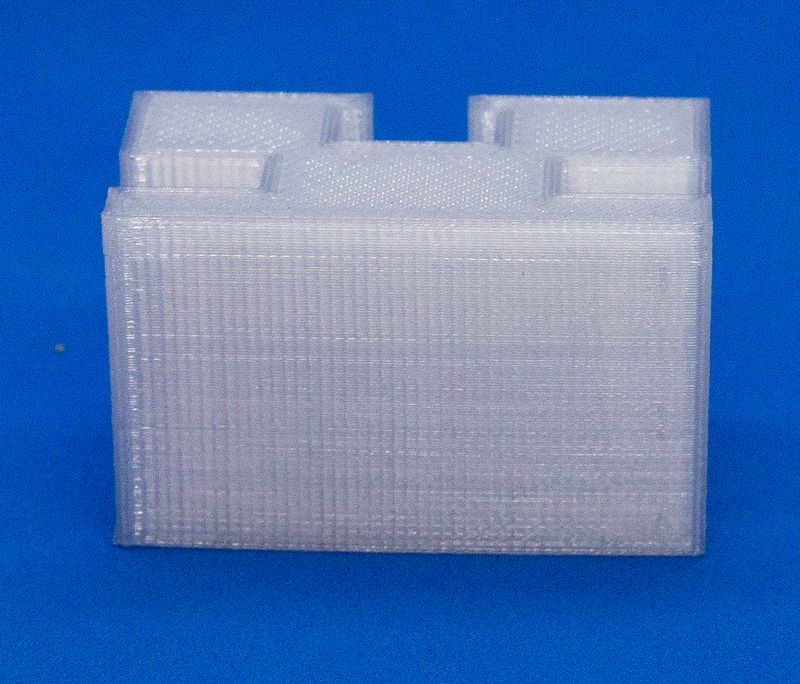
Results of printing with different belt tension. The left model in the top illustration is before adjustments. The print settings are the same in all cases.
In addition to the machine’s setup, another important factor is where the printer stands and what is the base it is placed on. If the base surface is uneven or wobbly, vibrations generated in the machine or its base can also affect print quality. If the printer wiggles, you might consider installing it on damping legs, a rubber mat, or reduce print speed and acceleration, which will be reviewed in more detail below.
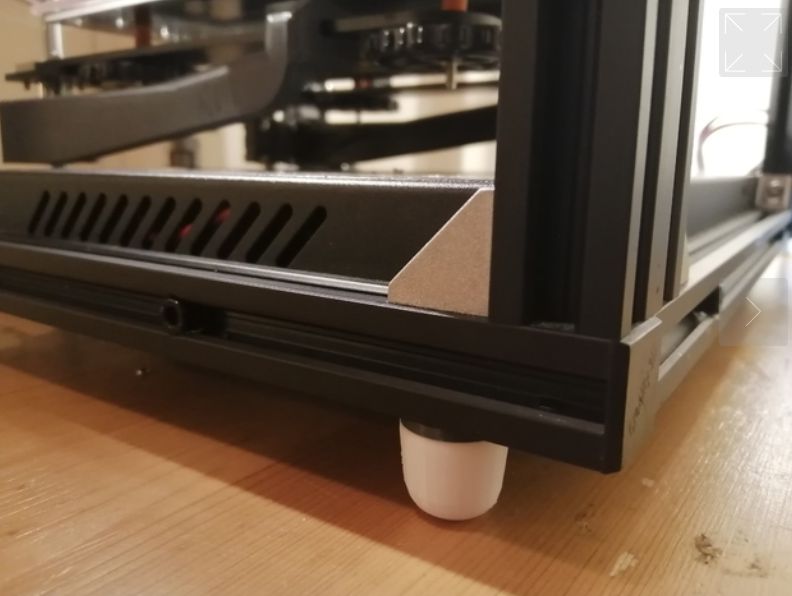
An example of simple 3D printed dampers for an extruded profile
Credit: thingiverse.com
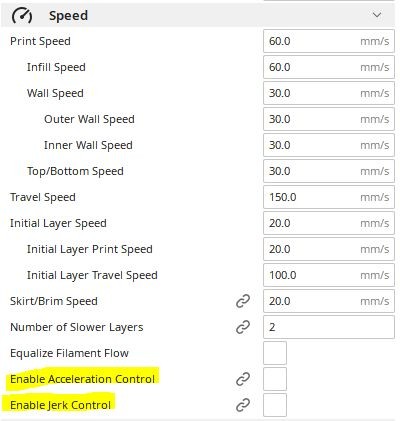
Print defects can be resolved by changing the print speed settings. Here’s a brief description of the parameters affecting print quality and speed.
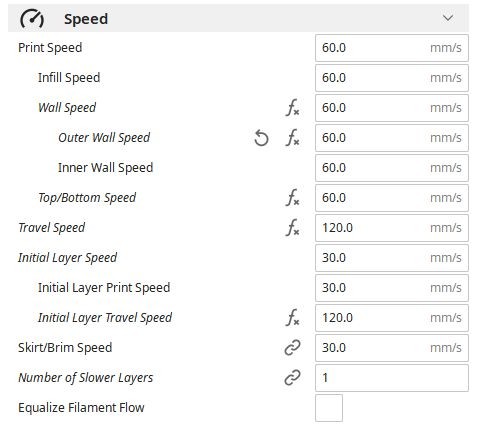
Print speed settings in Cura slicing software
This is one of the most simple settings that determines how fast the mobile parts of the machine will move during the printing process. It is measured in mm/s.
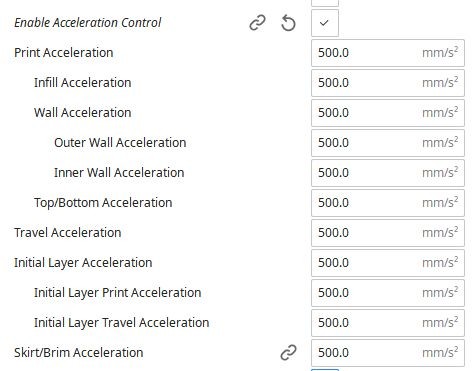
Acceleration settings in Cura (located in the lower section of the Speed tab)
This parameter sets the intensity of the increase or decrease in speed, or alternatively the acceleration or deceleration. For example, 1000 mm/s2 means that the speed can increase by 1000 mm/s in one second.
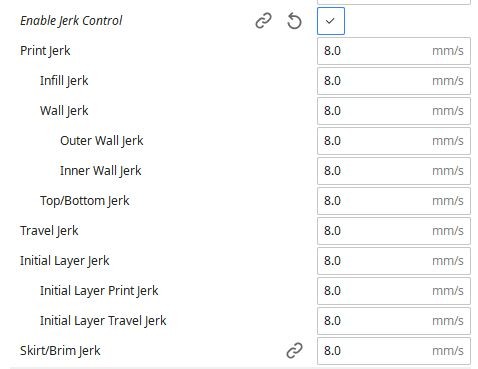
Jerk settings in Cura (located in the Speed tab, below acceleration)
This parameter specifies the maximum speed change the printer can make without applying acceleration.
It is used when changing direction. Let’s suppose the printhead is approaching a corner of a part. The speed decreases according to the acceleration value to the calculated threshold value, the direction changes and the movement continues for a while at the minimum speed until reacceleration begins.
The jerk is the absolute change in speed on both axes, from the end of braking to the start of acceleration.
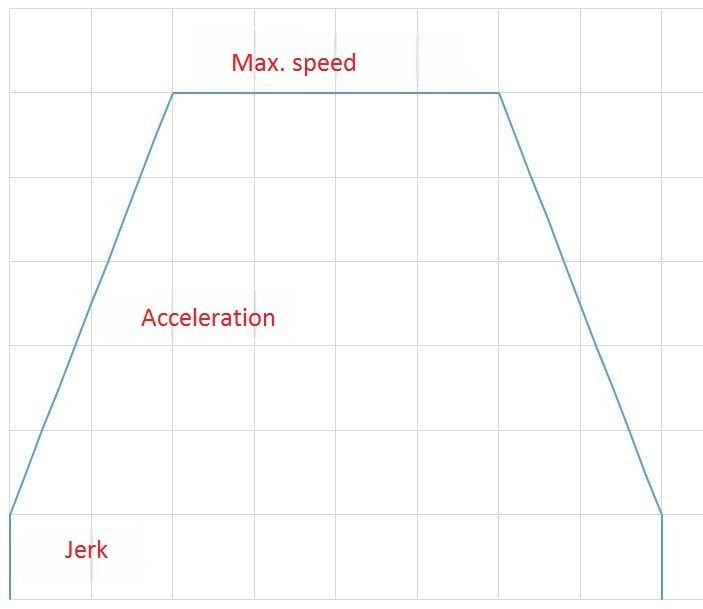
In general, more jerks, higher acceleration, and speed lead to faster printing albeit increasing the likelihood of defects and even failed prints. The value of jerks is usually 10-30 mm/s. Acceleration and jerk settings are stored in the printer firmware but can be changed in the EEPROM* settings or using special commands in the print file.
*EEPROM is read-only, rewritable memory that stores a number of printer settings: the number of motor microsteps per millimeter of movement, heater calibration values, maximum movement speeds, acceleration, etc.
Typical acceleration values for consumer 3D printers are 500-5000 mm/s2. Higher acceleration leads to faster printing and more demanding requirements for the rigidity and reliability of the printer’s components. The calibration model provided by the Calibration Shapes plugin for Cura is a convenient tool for determining the maximum allowable accelerations. Cura versions after 1.7 have an Acceleration Tower model.
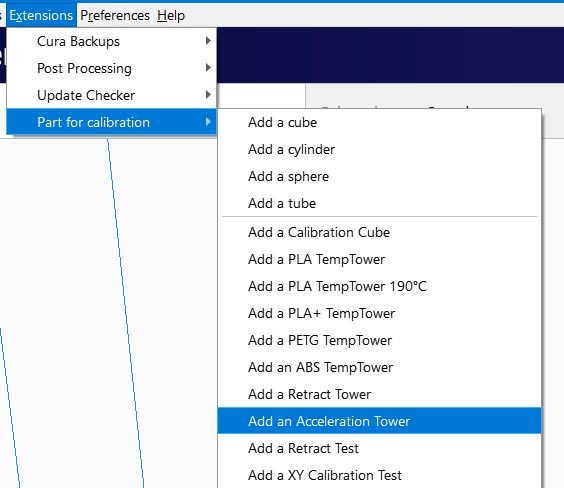
Adding a test model
A post-processing script should be added for the test model
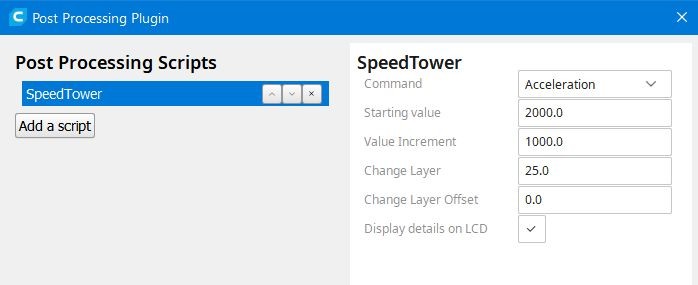
The Speed Tower script with the specified settings increases print acceleration by 1000 every 25 layers (5 mm at a 0.2 mm layer). The initial value is 2000 mm/s2.
Increasing the print acceleration should be done with caution. In the case with the Kingroon KP3S, the machine failed at 7000 mm/s2, which caused the print to shift in the Y-axis.
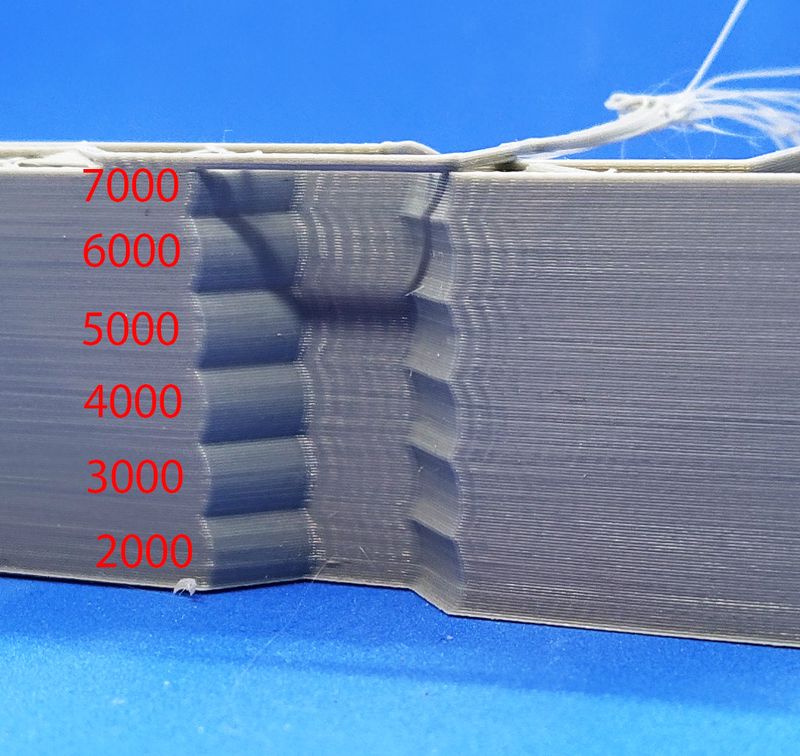
As a result, we can derive that when printing at a speed of 60 mm/s on the Kingroon KP3S, it makes sense to set the acceleration to no more than 3000 mm/s2.
If extrapolated to other print speeds, the ghosting pattern will remain similar in intensity, but at a lower speed, the defect area will be shorter, and longer at higher speeds.
Identical jerk and acceleration settings. From left to right: slightly visible ghosting at 30 mm/s; noticeable ghosting at 60 mm/s; significant ghosting at 90 mm/s.
Acceleration and jerk settings in Cura are applied directly to the print file. After the preferred values of these parameters are determined, it is advisable to save them to the printer’s read-only memory. If the machine is equipped with a monochrome screen (basic version of Ender-3, for example), the menu will contain acceleration and jerk settings: Control - Motion - Acceleration and Control - Motion - Jerk. After changing these parameters, you must save them: Control - Store Settings.
Acceleration and jerk values should be disabled in the slicing software if you need to use the values saved in the printer’s read-only memory
3D printers with graphic color touch screens usually lack the ability to fine-tune the machine. In this case, we would consider two options for saving the acceleration and jerk values in the read-only memory.
The first option is to generate the gcode manually. This can be done using a simple text editor such as Windows Notepad. Create a text document, write in the gcode, change the file extension to “.gcode” and save the file to a memory card and print it.
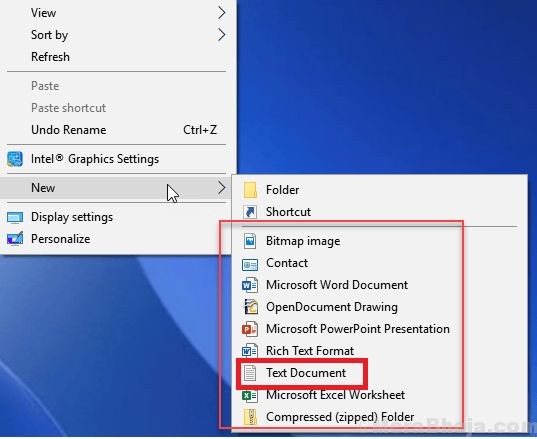
Creating a text document
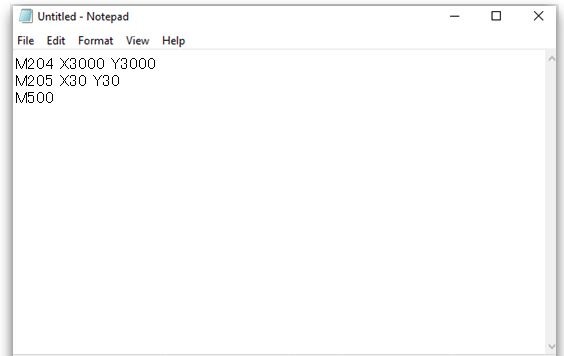
Saving the gcode
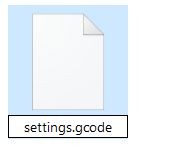
Changing the file extension
The first command sets the accelerations to 3000 mm/s² for the X and Y axes. The second command sets the jerks to 30 mm/s respectively. The third one saves the changes in the memory. Printing this G-code file will cause the specified settings to be stored in the printer’s read-only memory. After launching this file, all subsequently launched files engage the specified speed, acceleration, and jerk settings.
The second option is to insert these commands into the slicer start code so that they are applied before the next file is printed.
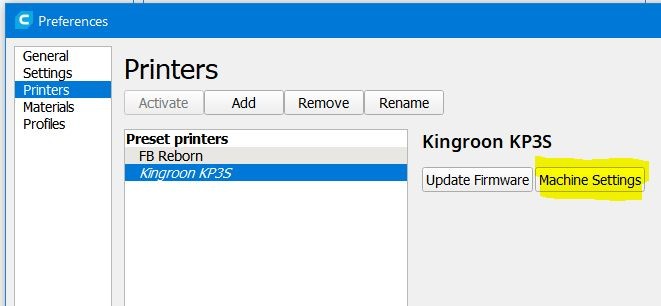
Preferences - Configure Cura - Printers - Machine Settings
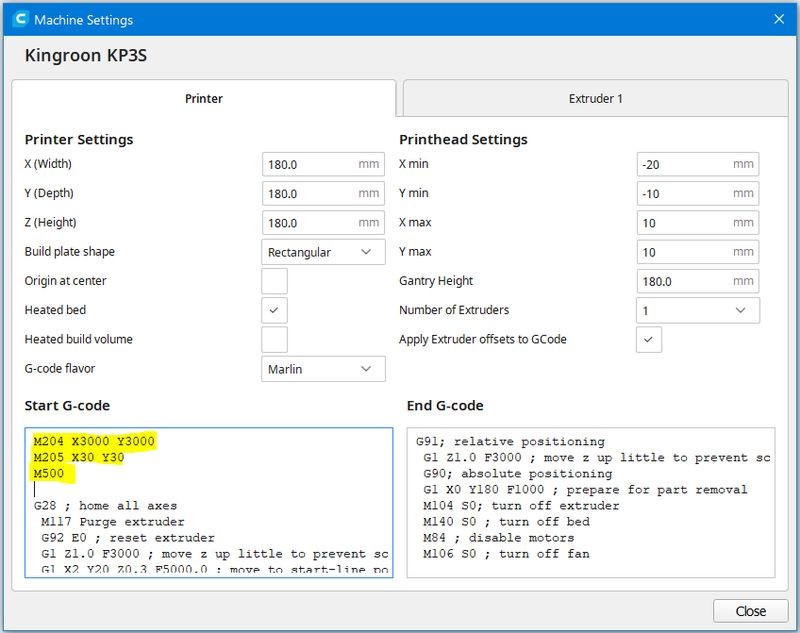
Inserting control commands into the slicer’s start code

Before preparing the next file, it is advisable to recover the start code to its original state.
Uniform ringing, in this case caused by a loose belt
There is another print defect similar to the one described above. The main difference is that the vertical waves are straight and don’t follow the contours of the holes and protruding sections of the printed part. They are also distributed evenly over the vertical surfaces and don’t group in places where the direction of movement changes.
The reasons for even ringing include excessive belt tension and poor quality pulleys and motors. Depending on the machine's design, if the ringing is uneven but intermittent, this may indicate worn or damaged guides, linear bearings or rollers.
The ghosting defect (ringing, rippling), which is clearly visible on even vertical surfaces, is usually generated by mechanical vibrations of the printer's components. Check the state of the printer’s fasteners and the tension of the belts, and then adjust the speed, accelerations, and jerks to resolve a ghosting issue. Printing test models will help in finding the best speed, acceleration, and jerk settings for a particular 3D printer. The obtained values can be used in the slicer settings or stored in the machine's read-only memory.
Update your browser to view this website correctly. Update my browser now


Write a comment