Compared with other types of 3D printing, resin-powered additive manufacturing offers a number of considerable advantages. For the most obvious ones, it provides you with millimeter-precise outputs and lets you choose from a plethora of printable materials such as castable, biocompatible, engineering, general-purpose, and other resins.
Besides, thanks to the recent optoelectronics breakthroughs and the fact that the contemporary additive manufacturing market is as competitive as ever, newly-developed 3D printers boast their accuracy, precision, accessibility, and ease of use. As you can guess, this is why 3D printing enthusiasts and entry-level users are beginning to shift their attention towards resin 3D printing. Needless to say, it is crucial to understand how to properly set up a resin 3D printer and choose optimal settings so it can provide you with the results you want and even better.
We invite you to proceed with the article if you’d like to know how to fine-tune and set up your resin 3D printer for optimal performance. Besides, we are going to troubleshoot some of the most common resin 3D printing problems. Let’s get started!
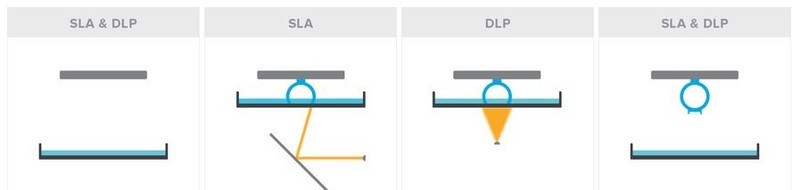
To date, most resin 3D printers are powered by SLA, DLP, and LCD 3D printing technologies. The image above demonstrates a step-by-step comparison of how 3D printing of a ring is handled by SLA and DLP technologies.
First, the printer’s resin vat has to be filled with a photocurable polymer — a liquid resin that changes its properties and gets solidified when exposed to a UV radiation source. The printing itself starts when the printer’s build platform submerges into the resin and a layer-by-layer photocuring process takes place, thereby forming a solid three-dimensional model.
Over the course of SLA (Stereolithography Laser Apparating) printing technology, the photocuring is carried by means of a laser beam that falls onto a system of scanning mirrors or lenses that reflect the beam on the resin to create desired geometry and shape a three-dimensional model.
In its turn, DLP (Digital Light Processing) 3D printing technology employs a UV projector which cures the entire layer at once.
Finally, there is also LCD (Liquid Crystal Display) technology that employs a high-end optical system where light is generated by means of an array of UV LCDs.
The subsequent workflow remains the same for all of the above mentioned technologies. After a layer is formed, the building platform lifts up to let another portion of resin into the working area. Then, it lowers again to make the distance between the forming model and the bottom of the vat to become equal to the thickness of the layer. After this, the next layer gets exposed to the light source, and the process repeats. Thus, the main difference between those printing technologies lies in the fashion in which the light source is employed and generated.
Our experience shows that:
SLA 3D printers don’t require any specific setting adjustments — as a rule, factory settings show incredible performance for the vast majority of projects;
For the most part, all the essential settings of DLP 3D printers will match those used on their LCD-powered counterparts.
To be more precise, we are talking about desktop resin 3D printers employed in the medical field. That is, for dental applications, for the creation of dental prosthetics, as well as for personnel training, prototyping, and/or production of unique objects like tabletop miniatures. Another advantage of resin 3D printers is that they can be effectively used to create jewelry pieces.
Considering all of the above, we will be reviewing optimal settings for the Phrozen Sonic mini — an entry-level LCD-based 3D printer that shows outstanding performance ensured by fast printing speed and precise outputs. Besides, it is a budget-friendly machine that comes at a sub-300$ price tag.
The Phrozen Sonic mini is a compact and affordable 3D printer perfect for both entry-level users and experienced 3D printing enthusiasts. It is a universal device that can help you complete a wide array of projects, be it the creation of tabletop miniatures, prototyping, or continuous production of millimeter-precise dental impressions or jewelry pieces.

Source: phrozen3dp.com
The Sonic mini is an LCD 3D printer that employs LCD printing technology and is equipped with a long-lasting monochrome matrix that ensures more than 2000 hours of life. It is compatible with every 405nm UV resin available on the market, letting you benefit from the freedom of choice and not tying you to any particular vendor.

Source: twitter.com
All of the 3D printers produced by Phrozen are powered by Phrozen OS, a proprietary operating system with an intuitive and easy-to-use interface.
The devices are recommended to be used with ChiTuBox — a free all-in-one slicing software solution that works with .stl files and lets you edit and rotate your 3D models as well as fine-tune the settings. You can select one of the pre-installed user profiles or create your own and adjust the printing parameters for each particular resin as you see fit. In order to be correctly processed by a printer, the files are automatically converted to .phz format right before the printing process begins.

Source: facebook.com
The Phrozen Sonic mini is compatible with every photopolymer resin with a 405nm wavelength no matter the manufacturer. As a rule, you can find the optimal settings for each particular resin on their manufacturer’s website.
In case you were unable to find the settings for the resin and/or printer you are using, we recommend copying the print settings for a similar 3D printer and/or resin of the same color. After this, try things out by making a test print. Test prints are very important and should be made even if you are provided with official settings recommended by the manufacturer.
Another important thing to keep in mind is that a photopolymer bottle must be thoroughly shaken for no less than 5 minutes before pouring it into a resin vat.
Before turning the Phrozen Sonic mini on, it has to be set up properly. First, detach the resin vat and place a sheet of paper onto the build area. Second, loosen the four screws of the printing platform. Make sure that the platform can move freely and start the calibration process by using the menu. The printer platform will descend to its lower position automatically. Lastly, tighten the screws, gently pressing the platform against a sheet of paper, and lock it in a position so it is directly faced at the matrix.
Source: chitubox.com
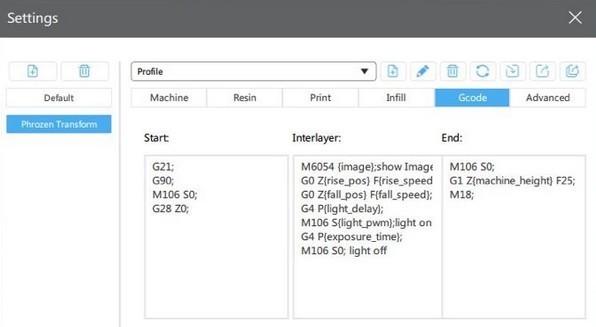
For most printers, the settings adjustment is carried out by using a PC after a proper 3D model has been created and is ready to be printed. Phrozen 3D printers, however, feature a built-in integration of printing profiles. When the printer works with a file using a native slicer (Phrozen 3D or PZslicer), it reads all the setting values directly from the file. In case a third-party slicer (ChiTu Box) is employed, the printer reads the values from the printing profile saved in the printer itself.
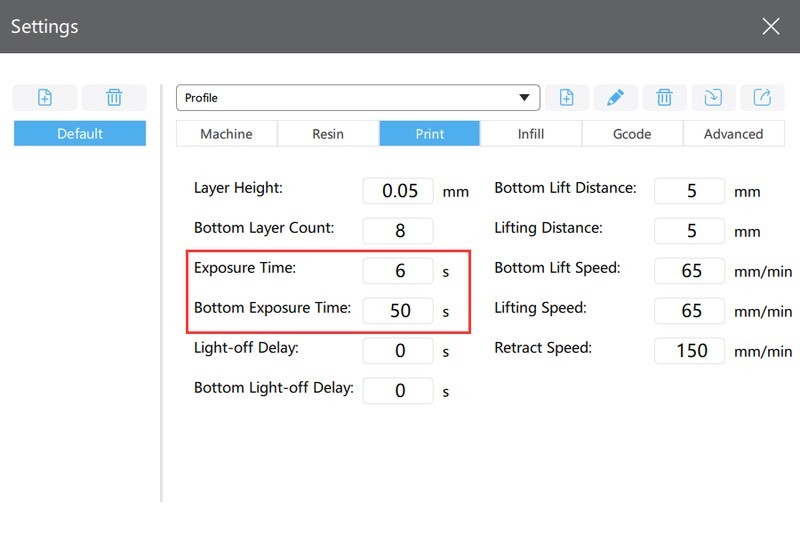
The most important settings are ‘exposure time’ and ‘bottom layer exposure time’. All of the other parameters are secondary.
First, you’ll have to select a desired layer height. We recommend going for 0.05 mm (50 microns) for your first print. In case of printing with a high-viscosity polymer, opt for a 0.10 mm (100 microns) layer height. This setting has to be manually re-adjusted each time you wish to print on another layer height.
The lower the layer height, the higher the print quality and the longer it takes to complete a single print. It is important to take your time and find the balance between the quality and print time based on your particular application and requirements.
Exposure Time
The exposure time accounts for the amount of time that each layer will be exposed to a light source during printing. The optimal value for the majority of applications can be found between 3 and 20 seconds.
First, try following the manufacturer guidelines, but be prepared to make necessary adjustments if needed. The optimal exposure time value depends on the resin composition and the luminous power of a given 3D printer.
For instance, if you are printing with the Harz Labs Dental Clear resin, the optimal exposure time for the Phrozen Sonic Mini 4K would be between 4.3 and 5.0 seconds. On the other hand, printing with the same resin on the Phrozen Shuffle 2019 would require the same parameter to be somewhere between 7.7 and 9.0 seconds.
If the setting was set too high, the printed model will become wider than expected since photopolymer will harden in the adjacent areas as you can see in the first photo below. On the other hand, if the exposure time is too short, the model will become narrower as displayed in the second photo below.

First test model printed with Harz labs model grey
Take a look at area number one. As you can see, all of the gaps were printed incorrectly and were filled with extra resin. To fix this, the exposure time has to be reduced by 20-50%.
Shifting the attention to area number two, you can see that 3 out of 4 parallelepipeds were printed correctly. This is a good result and it may be quite acceptable even if neither gets printed correctly since correctly printed gaps are of a higher priority.
Please note that the final model is not yet 100% cured after the printing is finished. After post-processing the model by washing it in an alcohol solution, you might want to do some additional post-processing by using a UV curing lamp to improve the model’s appearance.

Second test model printed with reduced exposure time
Bottom layer exposure time
This setting accounts for the amount of time that will be spent on curing the first layers that will later become the foundation of your model. Please note that the value of this particular setting should be higher than the exposure time of all the other exposure time-related settings so the optimal level of adherence to the platform can be achieved.
Set the initial value according to the recommendations of the resin manufacturer. If the model doesn’t adhere to the platform, increase this parameter by 10 or 50% and also consider trying the values in between. An excessive increase of this parameter will lead to a considerably increased printing time. Moreover, if the exposure time is too long, the lower layers will turn out to be much wider than needed (the elephant’s foot effect). If the problem persists, try adding supports.
As a rule, you won’t experience any misprints if the above-mentioned settings are adjusted correctly. Basically, the fine-tuning goes the following way: if a test model you’ve printed is of bad quality, you re-adjust the setting and run a test print again. The process is repeated until an acceptable result is obtained.
Let's quickly review the rest of the settings, although, in the overwhelming majority of cases, there is no need to re-adjust them.
Bottom Layer Count
This is the total amount of layers that will become the foundation of your model, that is, the number of layers that will be printed according to the bottom layer exposure time. We recommend setting the value to 5.
Light off delay
The amount of time required for the viscous polymer to flow under the model. In most cases, the optimal value for this setting is 1 second.
Bottom light off delay
This setting specifies the delay between the end of the descending movement of the platform and the beginning of the exposure. This time interval is necessary to eliminate the negative impact that the resin can cause on the integrity of the model. We recommend leaving it with the factory value.
Lifting distance
The height to which the build platform will rise. The optimal value would be somewhere between 4 and 6 mm. If the value is less than 4 mm, the model is highly likely to not come off the bottom of the vat at all.
Retract/lifting speed
The speed at which the platform moves up and down. You can try to increase the value if your 3D printer is a high-end one, but in our opinion, it is better to leave it alone.

In case your model detaches from the platform, try increasing the bottom exposure time by 30-50% since this will considerably increase the level of adherence.
This happens due to insufficient exposure time. Increase it gradually, adding 2 seconds for each new test print. Keep in mind that if the exposure time is too high, your print will become thicker due to the fact that the resin around it will also begin to harden. Our experience shows that the exposure time can exceed the value recommended by resin manufacturers by up to 10 seconds.
In case your print is too big and you don’t have the time to print at 50 microns, try printing at 100 microns to significantly boost the printing speed. Don’t forget to increase the exposure time by at least 2 or 3 seconds.
Additionally, big and heavy prints require strong and thick supports. Make sure to re-adjust all the necessary settings and prepare a proper digital model.
ATTENTION!
Make sure to wear protective equipment and follow safety guidelines when printing with resins.
Each time a new resin is used, make sure to run a couple of test prints to find out that your machine is properly calibrated and works as intended.

The height of the model displayed in the photo above is just 1.4mm. Depending on the settings, it will take you from 5 to 25 minutes to complete this test print. This test print will help you assess the print quality and see whether some of the settings have to be re-adjusted:
if the gaps didn’t print properly, reduce the main layers exposure time;
if the parallelepipeds didn’t print properly, reduce the main layers’ exposure time.

By printing this all-in-one test model you will be able to evaluate the correctness of the selected settings, see whether the printer is properly calibrated or not, check if your resin is suitable for printing certain shapes and much more. You can learn more by reading the model description.
Please keep in mind that even though the whole 3D printing process looks very simple and straightforward, it still requires some experience and expertise. Make sure to re-adjust the settings when changing resins and make sure to always run a couple of test prints before proceeding to the execution of your project. Be prepared to encounter a variety of errors, failed prints, and other unpleasant surprises. This may be frustrating at first, but those errors in fact are a common part of a troubleshooting process. We assure you that once you create your first 3D print, you will be more than satisfied.
You can always purchase quality resin 3D printers and printable resins at Top 3D Shop. We will provide you with certified equipment that comes with the manufacturer’s warranty. Besides, our team will make sure to provide you with the best service possible, just like we always do.
Update your browser to view this website correctly. Update my browser now

Write a comment