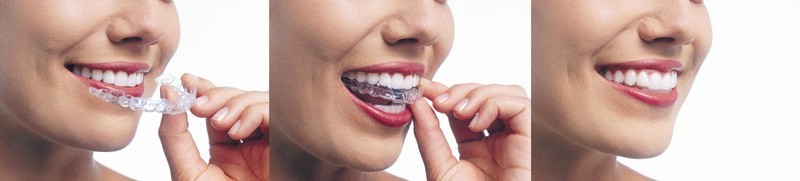
Dental aligners are wearable transparent custom-made mouthpieces that should be worn on a daily basis to ensure correct teeth adjustment over the treatment course. Unlike dental braces, aligners are almost impossible to see, besides, they are incredibly easy to remove and put on again. Read the article for more information.
Invisible dental aligners first appeared in the 1990s, when Align Technology had acquired all the necessary licenses and sold its innovative Invisalign system to American orthodontists in 1999. Shortly after, the company launched a full-scale advertising campaign in 2000, and by the end of 2001, invisible dental aligners appeared on the European market. It was a great success, and the company had to manufacture over a million mouthpieces to meet the rapidly growing market demand. By mid-2003, the study of Invisalign technology had been integrated into the educational program of dental schools, becoming an essential part of the education process every future dental maestro now has to master. Ever since then, there is a steadily growing demand for the manufacturing of quality dental aligners and their proper application in clinical practice.

Just like dental aligners, dental braces are among the list of the most effective tools that can be given to an experienced orthodontist to provide quality treatment. The main reason for this is that dental braces are powered by sturdy and reliable metal archwires and that the design of the dental bracket system lets you improve it with various additional elements to significantly expand the range of teeth movement.
Unlike dental aligners, the braces can only be removed by a doctor, leaving the patient with no room for error. In the most complex cases, braces can still help when aligners can not. Besides, a dental braces treatment course comes at more affordable prices.
All in all, dental braces are a more flexible and cheaper solution, while dental aligners can’t be used for each case. Another downside of aligners treatment is that the patient has to strictly follow the doctor’s recommendations and never neglect the rules of the treatment. Moreover, there may always emerge a need to create new dental impressions and manufacture a batch of aligners anew in case some adjustments were made to the treatment course.
The main reason behind Invisalign’s explosive success is that dental aligners are a lot more comfortable to wear. Unlike braces, dental aligners cannot be seen when worn, besides, they do not injure the oral cavity with their metal parts because they have none. Dental aligners are delicate devices that boast their smooth surface texture, making it impossible to damage the mucous membrane.
Carrying on with the pros of wearing aligners, we would like to highlight that, unlike their metal-made counterparts, dental aligners do not damage tooth enamel since they aren’t glued to the teeth with hard metal or ceramic orthodontic plates. Instead, aligners feature a set of compact locks made of biocompatible plastics that are fixed at several key points. Usually, there are six of them.
On the other hand, dental braces have the potential to cause some serious teeth damage. Aside from the destructive effects that metal-made parts may cause, there is an inevitable factor of poor oral hygiene dictated by the fact that braces cannot be removed by the patient himself. In the most extreme cases, this can lead to severe tooth decay and cause gingivitis or stomatitis. The tooth decay usually develops under and around orthodontic plates, so even when the braces get removed, there is a chance of visiting the dental clinic again, and this time, not for purely aesthetic purposes.

Besides, there’s always a matter of appearance. Dental aligners don’t look like medieval torture devices, and, unlike dental braces, they are almost invisible. Even if a person wears aligners, it is impossible to see them wearing them from more than a meter away.
Convenience is yet another important factor to keep in mind. After wearing aligners for some time, patients get used to wearing them and hardly feel them anymore. This once again highlights the fact that the impact of aligners-powered treatment on one’s quality of life is minimal.
Moreover, dental aligners can be easily removed by patients themselves, which is especially useful when one wants to brush their teeth, eat something, or just take a short break from wearing aligners to let their teeth rest. These breaks are very important during the first days of the treatment and can be taken up to four hours a day in total. Of course, it is crucial not to overdo it and try and wear the aligners for as long as possible.
Another limitation that dental braces bring is significant dietary restrictions — it is prohibited to eat solid food when wearing braces, so the patient will have to resort to a soft food diet. On the other hand, dental aligners don’t bring any dietary restrictions and a patient can eat basically anything.
Patients that wear metal braces also have to visit their dentist regularly. That said, dental aligners users only have to see their doctor once every one or two months.
As we have already mentioned, dental braces are incredibly powerful tools, however, their powerful impact oftentimes becomes excessive. In case the attending dentist made even the slightest mistake, brackets can cause some serious damage to the jawbone tissue and the roots. Besides, wearing braces causes greater discomfort and induces more pain-related issues.

Justin Bieber wearing Invisalign
To sum up, patients choose dental aligners over braces because they are more convenient to wear and almost impossible to see. There is a lot more information on the matter available on the Internet, besides, there is a plethora of different photos of satisfied users that now have the smile of their dreams, including celebrities.
With that said, let’s finally find out how additive manufacturing technologies can help you make a batch of precise dental aligners by yourself.
It used to go the following way: to manufacture a batch of millimeter-precise dental aligners, first, you had to take a patient’s dental impression and send it (or its three-dimensional model) to the aligners manufacturing company in the USA. Then, you’d have to wait until the aligners are manufactured and shipped to provide them to your patient. After providing the patient with a set of aligners and instructions, the aligners must be worn and gradually replaced with one another according to the instructions provided so that they can straighten the patient’s teeth and move them into a correct position.
As you can guess, the fact that dental aligners had to be manufactured in another country and undergo international shipping made them extremely expensive for both clinics and patients. And since such shipments take a while to be delivered overseas, some of the patients ran into some unexpected trouble:
But alas, modern dental clinics are taking on a more refined and patient-oriented approach by making their own dental labs. To do so, they purchase all the necessary equipment and software that let them manufacture dental aligners right inside the clinics while remaining completely independent from their overseas colleagues.

Here are the main steps you ought to complete to make a batch of high-quality dental aligners:
You can find more information about the production of dental aligners from scratch by the end of this article or by clicking here.
Thanks to the benefits of on-site production, there is now completely no need to wait for the arrival of a parcel from another continent. Just like that, the dentist either shapes the aligners himself in case he has the right equipment at his disposal, or orders them from a nearby dental lab, since the devices can be easily molded using their 3D printed models. It’s also important to know that some materials allow for direct 3D printing of aligners.
By embracing all the advantages of additive manufacturing technologies, you don’t only make the whole manufacturing process significantly cheaper, you also make it incredibly faster and more straightforward.
Since Top 3D Shop strives to always be at the forefront of technology and because cutting-edge dental aligners production is directly connected with 3D modeling and printing, we decided to turn one of our employees into a guinea pig to get a hands-on experience and find out all the pros and cons of running our own dental 3D printing lab.
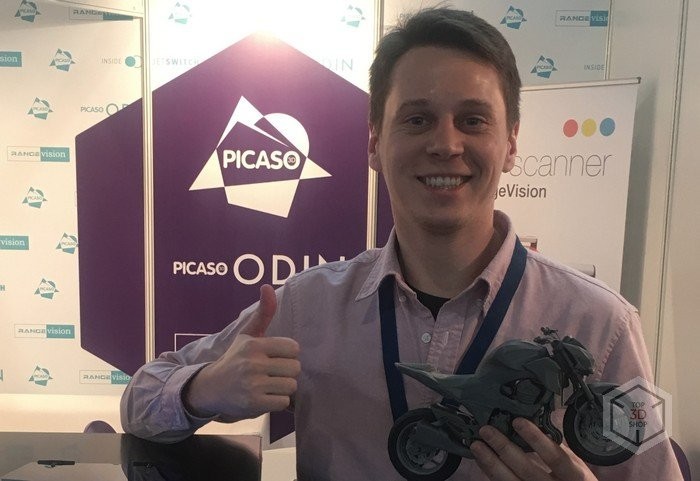
It just so happened that the guinea pig we chose for our experiment was none other than our CEO and development director, Vasiliy Kiselev.
For the glory of science, we had no other choice but to proceed with the plan.
You can see our CEO already wearing the aligners in the image below.
This decision was also influenced by the fact that Vasiliy had mandibular dental crowding and a malocclusion caused by impacted wisdom teeth. A classic story, really.
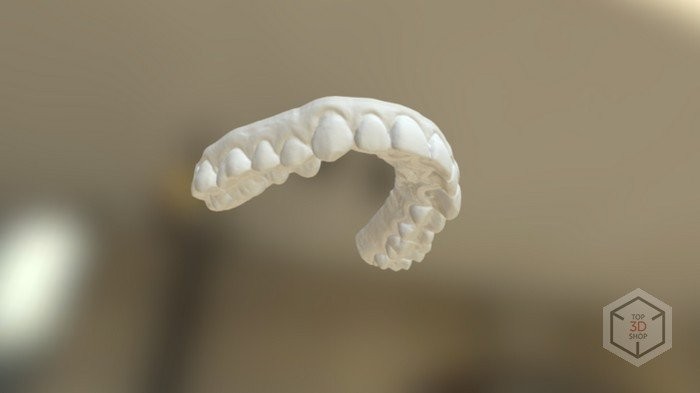
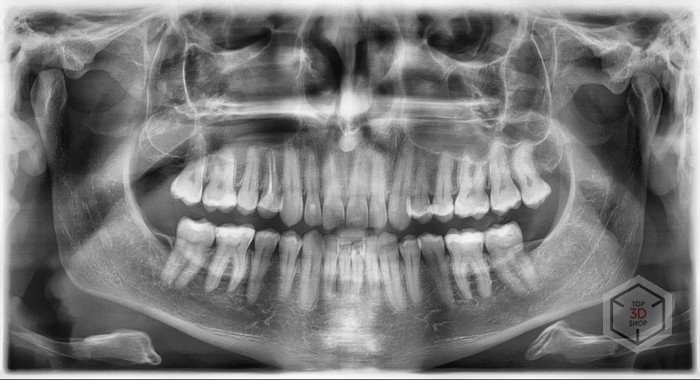
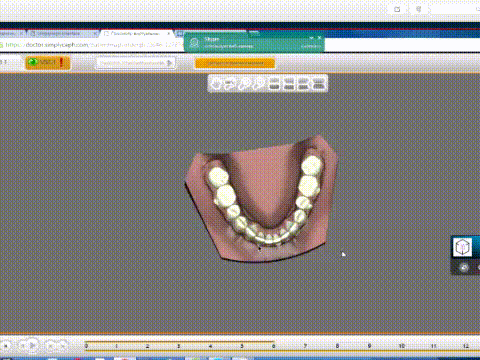
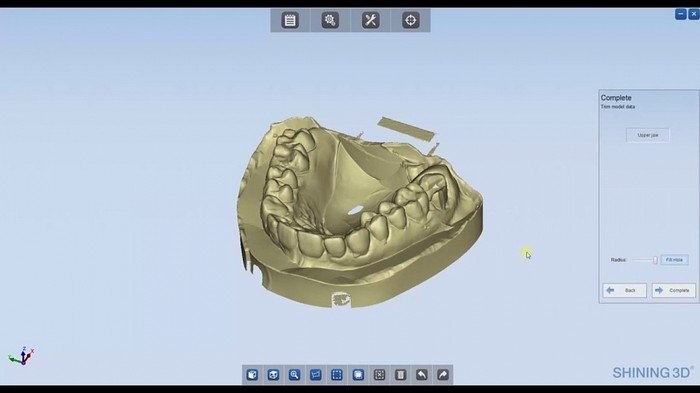
Take a look at the 3D scans of the jaw we made before completing the dental aligners treatment:
Maxilla:
Mandible:
Orthopantomogram (OPG):
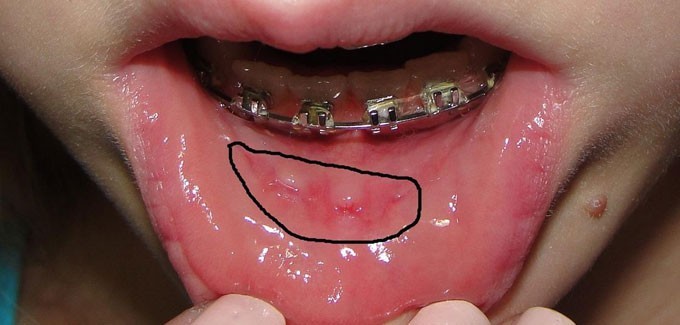
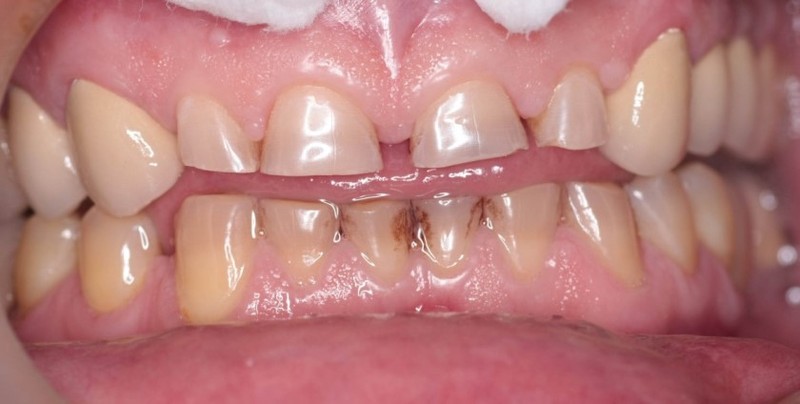
The malocclusion did not cause any trouble in his everyday life but required some kind of solution because it could facilitate the appearance of more dangerous problems such as dental abrasion.
Indeed, malocclusion can, and often does lead to premature tooth decay, digestive problems, and even intense headaches.
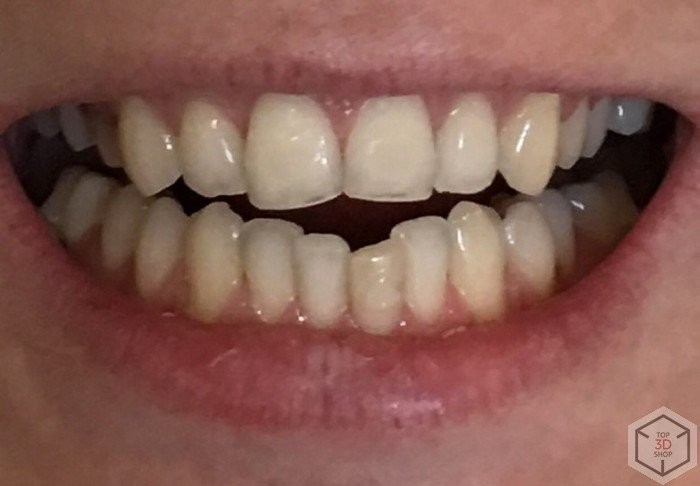
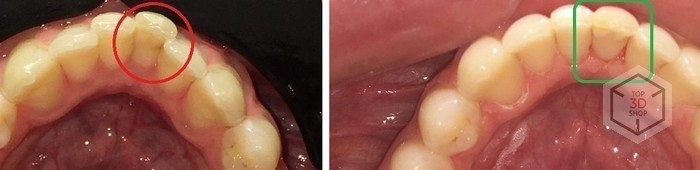
The photo below shows one of the most common malocclusion-caused problems dentists always have to deal with.
To tell the truth, we were fueled by the desire to test the limits of additive manufacturing applied in dental applications as soon as possible. There is also the fact that we have connections with many dental maestros, so we were able to quickly find an orthodontist who could be trusted with the treatment.
And we had yet another ace up our sleeve. At the start of the treatment, the patient’s wisdom teeth had already been removed, which gave the doctor some freedom of maneuver. Otherwise, they would most likely have to be removed, and then we would have had to wait out the rehabilitation period that usually lasts from three to four weeks.
In this particular case, the complete treatment took only six months, which is the minimum recommended period of wearing dental aligners. In contrast, the complete dental braces treatment course may take from ten months to several years depending on the complexity of each particular case.
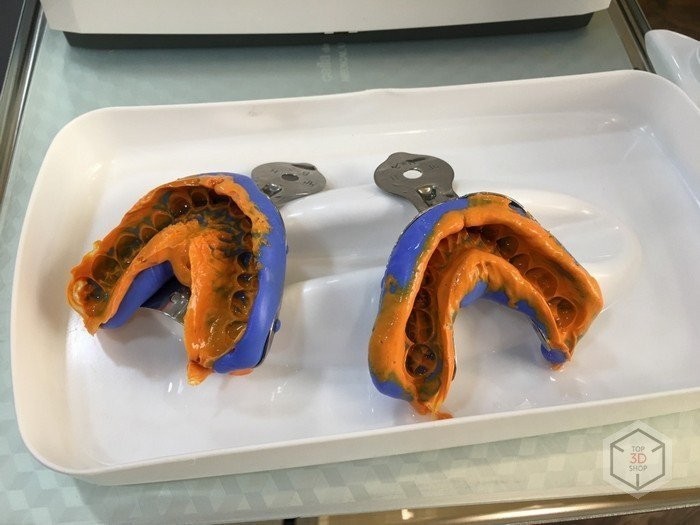
In practice, everything happened in a relatively simple and straightforward way. Vasiliy went to the doctor and they discussed the treatment details and created a couple of dental impressions.
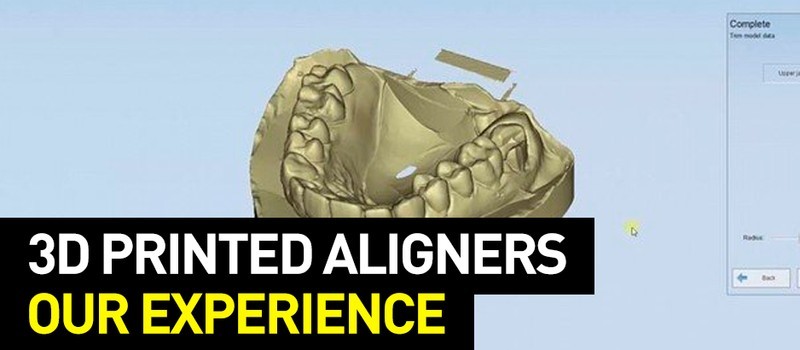
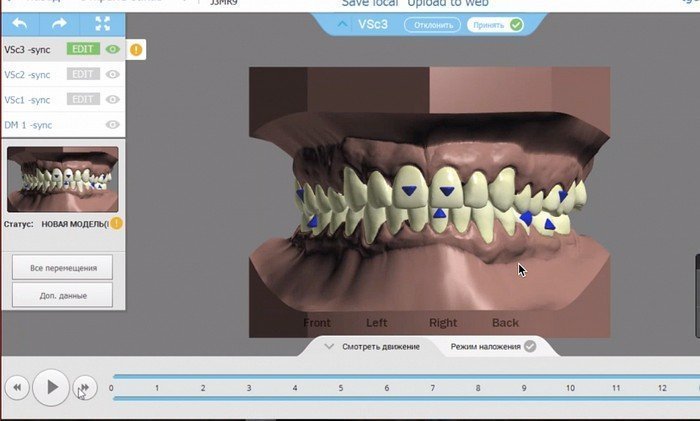
The next step was to work out a treatment plan. Take a look at the images below — this is how treatment planning works — they show the interface of a digital working space that displays everything up to the last detail, including the location of the blue areas, and also the final and intermediate results.
Here you can see how the correction of a slightly protruding upper tooth looks like:


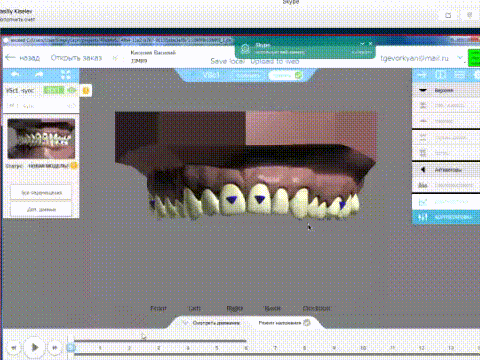
And this is how the teeth movement is simulated:


The treatment plan should be discussed with the patient and can be changed if necessary.
In our case, we had to make some adjustments to the plan since the initial goal was to correct only the mandible, but after taking the dental impressions and scans, it became clear that the upper teeth need to be straightened too. The final version looked like this:


Next, we had to install the compliance indicators and locks. Essentially, these are compact plastic stickers that reside on the surface of the teeth, keeping the aligners in place. You can see them colored blue in the digital studio interface.
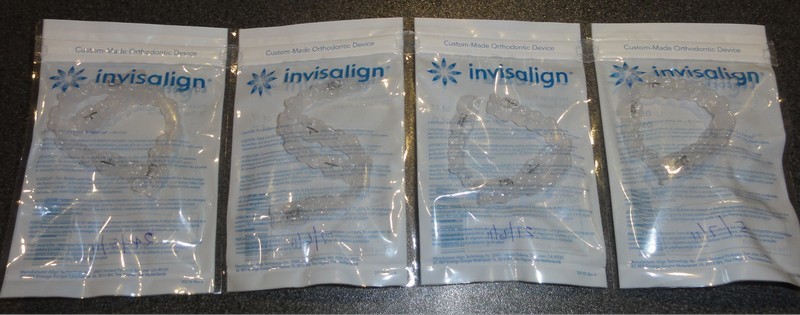
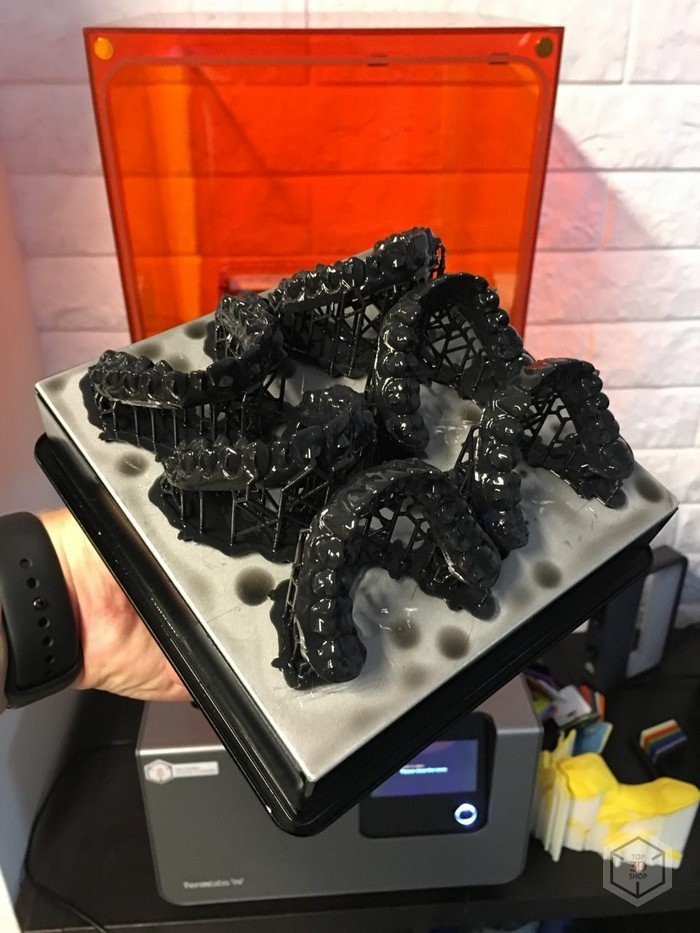
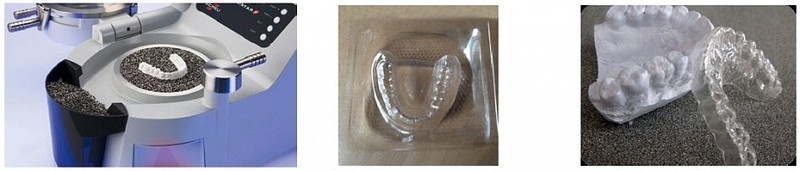
After installing the activator locks, we proceed to the most interesting part — the actual creation of clear dental aligners. There are several ways to do this and we are going to tell you about the experience we’ve had. After receiving a bunch of accurately shaped three-dimensional models from the dentist, we used the Formlabs Form 2, a professional SLA-powered resin 3D printer to print them using biocompatible photopolymer resins.
The guys from Star Smile, a Russian-based company that specializes in dental aligners production, were kind enough to lend us a helping hand and help us produce a set of individually-developed aligners that our CEO had to wear over the next six months. Moreover, they prepared all the necessary 3D models that we used to 3D print the aligners.
The workflow described here is considered as the most straightforward and convenient way to create dental aligners up to date.
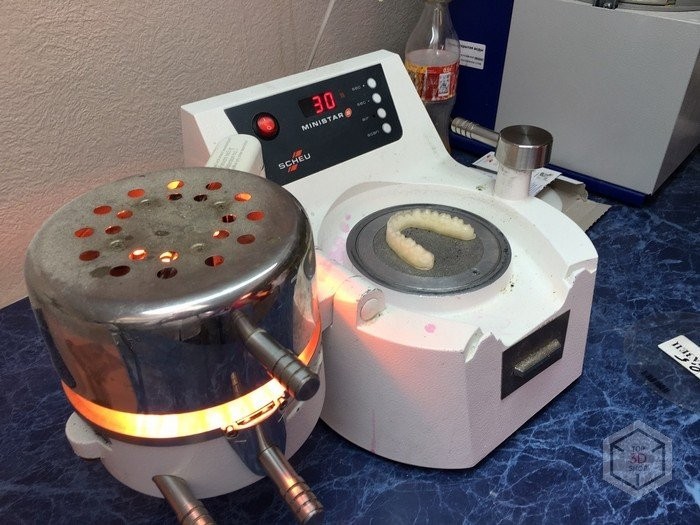
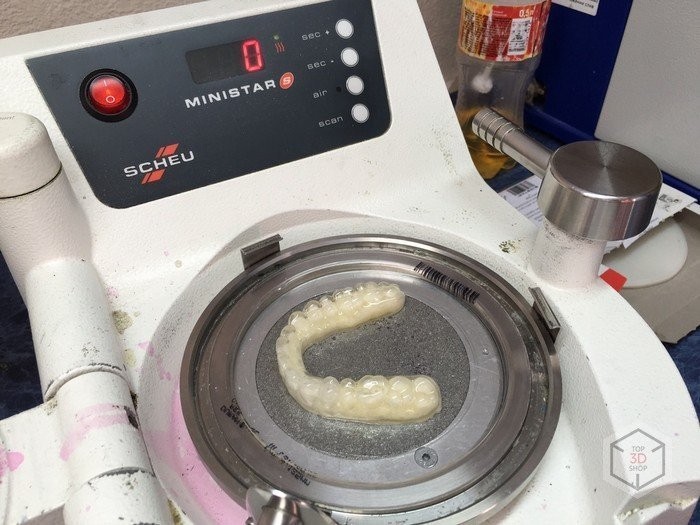
Here’s the picture of the molding process taking place:
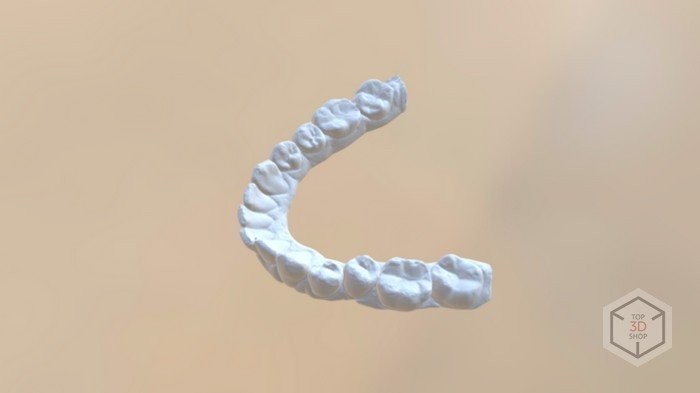
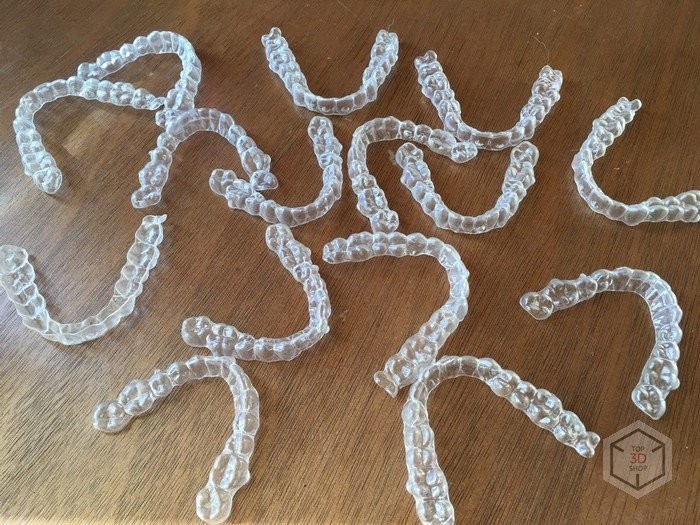
And this is how properly shaped and ready-to-wear aligners look like.

After the first pair of aligners have been equipped, the teeth straightening process finally begins. It is possible to experience some moderate discomfort in the first two or three days of wearing aligners, but it will gradually disappear with time. Hence, the teeth, slowly but surely, begin to move into the desired position.

In some cases, when the patient’s teeth prevent each other from growing in a desired way, it is necessary to carry out separation and isolate the contact surfaces between the teeth.
Each pair of aligners has to be worn for two weeks and then replaced with a subsequent pair, ensuring correct straightening progress.

With each and every replacement, the teeth move closer and closer to the desired position.
After the treatment course is finished, the dentist removes the locks and examines the patient for one last time. In our case, the teeth were aligned in the correct position, but the smile was not perfect. The thing is that Vasiliy had a grinded tooth that needed to be fixed to provide him with the smile of his dreams.
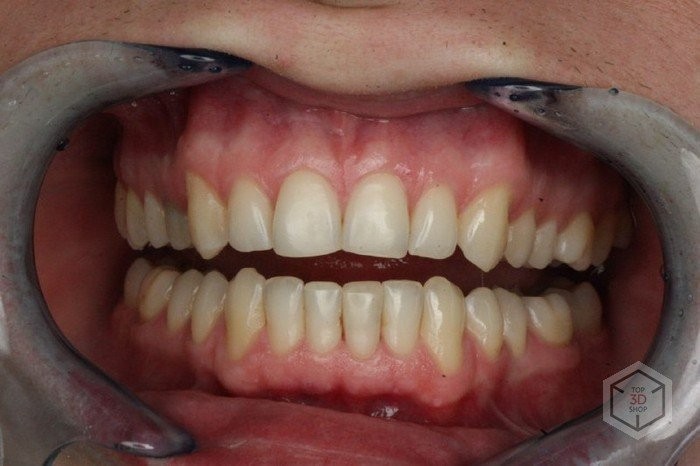
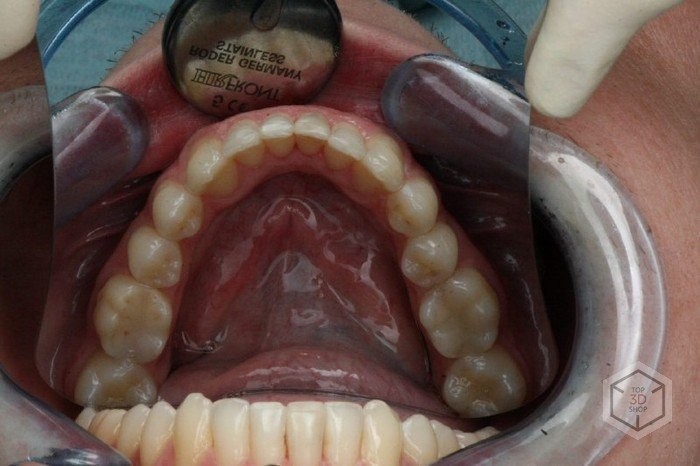
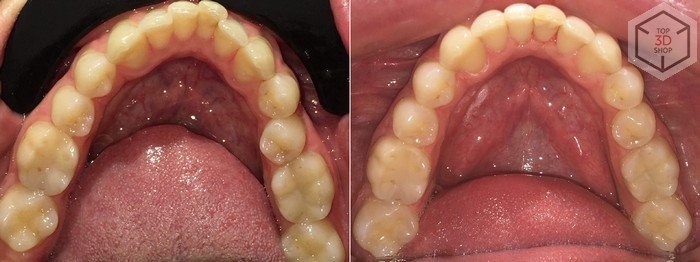
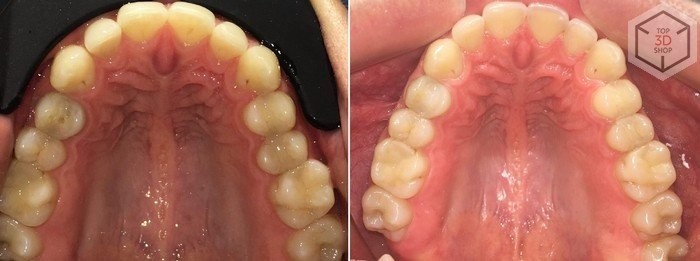
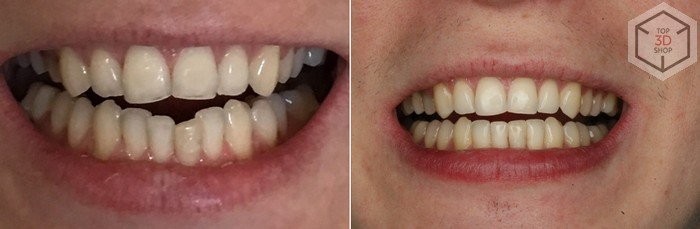
And here are the before-and-after pictures:
Mandible:
Maxilla:
The smile:
One of the most important points that must not be overlooked when planning the treatment is that it is necessary to straighten and move all the teeth, not only the crooked ones. Although patients usually want to adjust the position of some specific teeth, it is impossible to do, because all the teeth are connected position-wise.
Besides, even if you want to straighten only the maxilla or the mandible, you will still have to wear aligners on both of them. This happens since proper tension distribution is created only when a pair of aligners is worn. Not to mention that wearing a pair will cause you much less discomfort.
The first step that is taken during the bite correction treatment is the widening of the tooth rows in order to create some space for the teeth to shift in. In case the wisdom teeth have affected the position of the rest by improper growth (i.e. there is no more space for the rest of the teeth to move in), they most likely will have to be removed. Otherwise, you would have to undergo the teeth filing procedure which, truth be told, is harmful and not very effective.
You won’t witness any noticeable changes during the first stage of the treatment because it is not the crooked teeth that begin to move, but rather the ones next to them. This happens because there is a need to create enough space for the crooked ones to straighten and get into the desired position first. A noticeable effect will appear around the end of the treatment.
One of the most important advantages of aligners is that they can be removed during meals or when they cause too much discomfort to bear. Make sure to remove them for no longer than 4 hours a day in total. Apart from these breaks, the aligners must be worn at all times to ensure the desired outcome of the treatment.
As you can guess, this particular advantage has the potential of becoming the main disadvantage. In case an irresponsible patient exceeds the time limit and remains without aligners for too long, the teeth straightening process will slow down a lot. It may even lead to a complete treatment failure.
You can find dozens of negative reviews that come from dissatisfied customers who ruined their treatment themselves. Still, they insist that dental aligners are utterly useless and continue to lament over the decision of investing some money to obtain the smile of their dreams without putting much effort into it. But we know the truth.
Another minor inconvenience is that you'll have to always carry an aligner tray and a toothbrush with toothpaste with you until the end of the treatment. Both the aligners and the teeth must be thoroughly cleaned after each meal, not to mention the morning and evening routine. This may seem tiresome at first, but it quickly becomes a habit that will only bring benefits even after the course is completed.
Being a smart guy as he is, Vasiliy applied remineralizing gel while wearing the aligners in order to strengthen the tooth enamel. This is yet another advantage of picking aligners over braces since you can easily apply whitening, strengthening, and other solutions to the aligners to make your teeth even healthier.

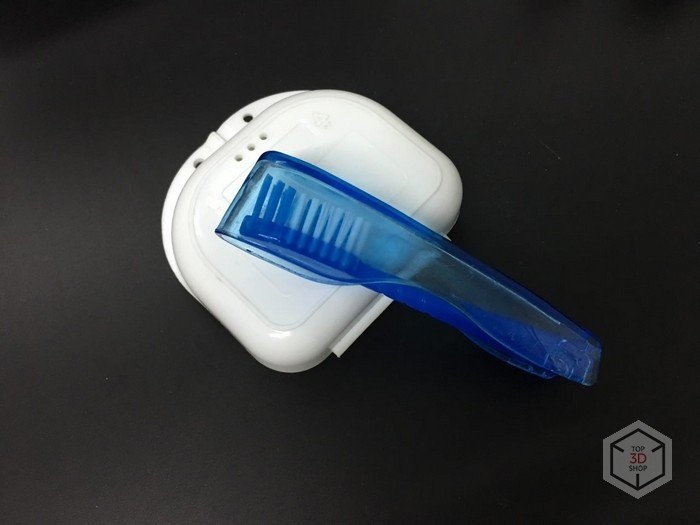
Special water-soluble pills will help you make a disinfectant solution for your aligners.
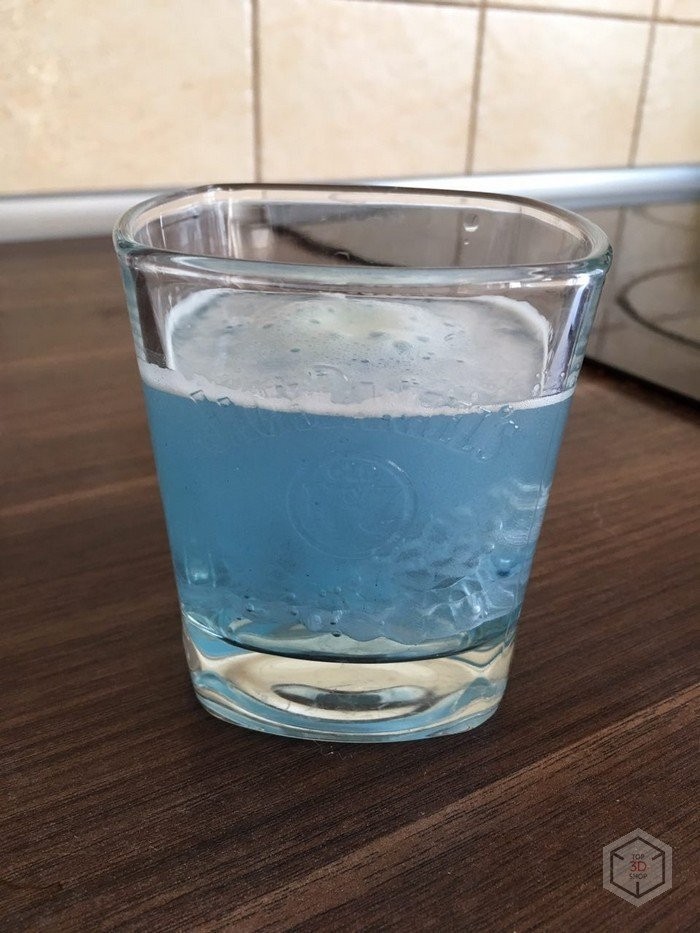
If there is no time or possibility to make the solution, you can always just thoroughly rinse the aligners with water.
In some unusual cases, aligners can crack. It doesn’t happen too often, but if it did, you need to contact your treating orthodontist and fix them or get a replacement. The replacement costs are usually included in the treatment fee and are not charged separately.
Another important thing to keep in mind is that it is necessary to revise the treatment and make regular adjustments to the course when needed. If something went wrong, the clinic should create new impressions and, obviously, a batch of new aligners. As a rule, such replacements don’t require additional financial investments from the patient.
The problems usually arise when the actual movement of the teeth was predicted incorrectly. In this case, the treatment plan must undergo some adjustments.
Sometimes, the patient’s teeth prevent each other from straightening correctly. Luckily, this does not happen too often. In our case, we only had to sharpen them by 100 microns three times over the entire treatment period.
An unexpected bonus: there was a problem tooth in Vasiliy's mandible. It was healthy but hypersensitive to stress and temperature. The neck of the tooth was exposed due to displacement and caused acute pain as a response to drinking cold beverages or eating something solid, even an apple. After the start of the aligners treatment course, this particular tooth began moving along with the rest. As a result, it got straightened perfectly while its sensitive area got isolated and the tooth became indifferent to both temperature and pressure changes.
This was a very notable and unexpected bonus that once again highlights the importance of correct bite.
Patients can purchase the aligners treatment course starting at $3,000. The price depends on the complexity of each particular case.
To manufacture a single dental aligner, you’ll have to spend around $5. We spent just $165 for the in-house manufacturing of a batch of dental aligners to complete the treatment described in this article.
To launch a full-scale production of dental aligners on your own, expect to invest at least $6,600. Add the costs of creating a batch of aligners into the mix, and expect to get the initial investment back after treating from five to seven patients.
With the help of the above-mentioned equipment, you can produce a variety of essential dental tools right within the walls of your clinic, such as:
Pros:
Cons:
Transparent dental aligners are among the most advanced and effective tools that modern dentistry has to offer. Our experience in creating aligners and a comprehensive study of the technology helped us create flexible and profitable solutions for dental clinics. As of now, we are already assisting all interested orthodontists throughout the world, and we are really glad to facilitate the promotion of such cutting-edge technology.
Now, let’s talk about the two options that lie before you if you want to upgrade your clinic with 3D technologies:
Besides, we are ready to work out a completely new option just for you in case your dental lab already has some of the required equipment and software.
If you are yet to decide which path to take, you can always order a sample of a dental aligner manufactured by our specialists.
Let’s take a closer look at both options to see what to expect.
Step 1: Gathering initial data

First, you gather all the necessary data, namely: obtain a patient's dental impressions, take an OPG, intraoral scans, and a photo of the patient’s smile. Then, you upload it into a digital working space.
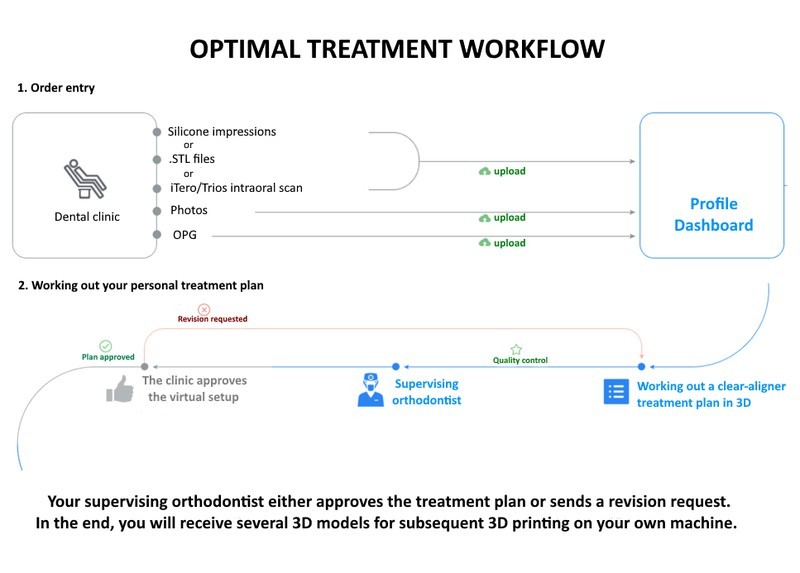
Step 2: 3D scanning the impressions
You can either scan the dental impressions by yourself or simply order the scans.
Step 3: Working out the treatment plan
A 3D modeling specialist works out the treatment plan and your supervising doctor approves it if it meets the expectations. If not, we revise it for free. In the end, we send you a set of .STL files to 3D print.
Step 4: 3D printing the aligners
You print the models on your 3D printer for subsequent molding. The costs per model, material-wise, will never be more than $10.
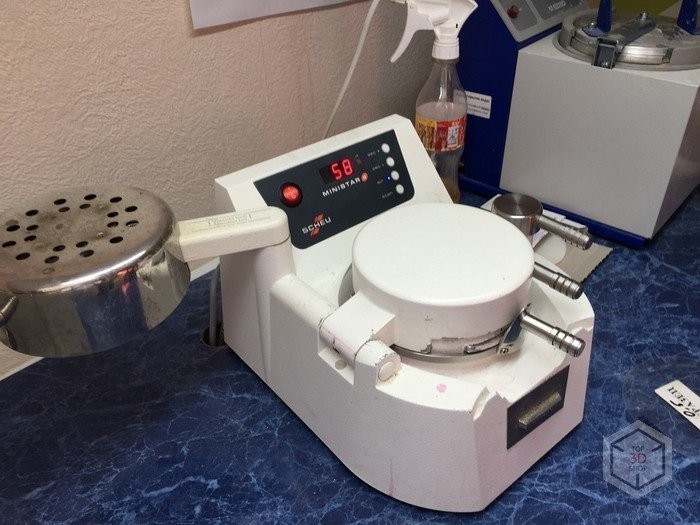
Step 5: Molding and post-processing
You complete the creation of dental aligners by molding the printed parts on a pressure molding machine, ensuring high quality of the end-use aligners.
Step 6: Packaging and branding

Aligners should be supplied in a neatly-looking box that also contains a set of detailed instructions for both patient and the doctor. Each box should also contain an aligner tray.
Pros:
Cons:
The undeniable advantage of the maximal option is that all the modeling processes take place within your clinic, which greatly reduces the outsourcing costs and patient care time.
Pros:
Cons:
We can also help you find a complete solution for the production of surgical templates, temporary crowns, demountable models, mockups, and other tools for subsequent molding.
Update your browser to view this website correctly. Update my browser now


Write a comment