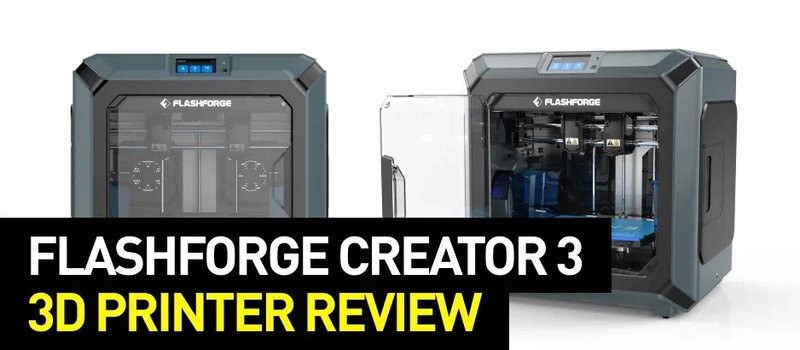
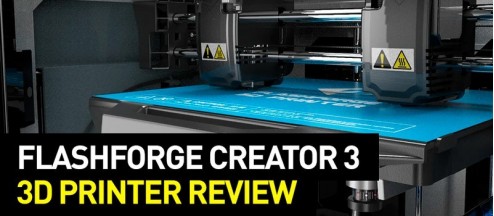
Hi everyone! This is Top 3D Shop, and today, we are going to examine one of the most advanced 3D printers by the renowned Chinese company Flashforge — the Creator 3. Let’s find out what the machine has to offer as well as dive into the extensive tests with various materials in different print modes.
Although the printer shares the name with the Creator Pro, this iteration has nothing to do with that model. In fact, they are completely different in size, design, and capabilities.
The machine boasts practically all of the modern basic smart features: it has filament runout sensors, semi-automatic bed leveling, touchscreen, Wi-Fi/Ethernet support, print area lighting, webcam, extruder cleaning system, and more, as well as two independent extruders. Read on to learn more about the technical specifications of the printer and its highlights in detail.
![Flashforge Creator 3 3D Printer [Clearance]](https://top3dshop.com/image/cache/catalog/products/3d_printers/flashforge/creator_3/flashforge_creator_3_3d_printer_3-486x540.jpg)
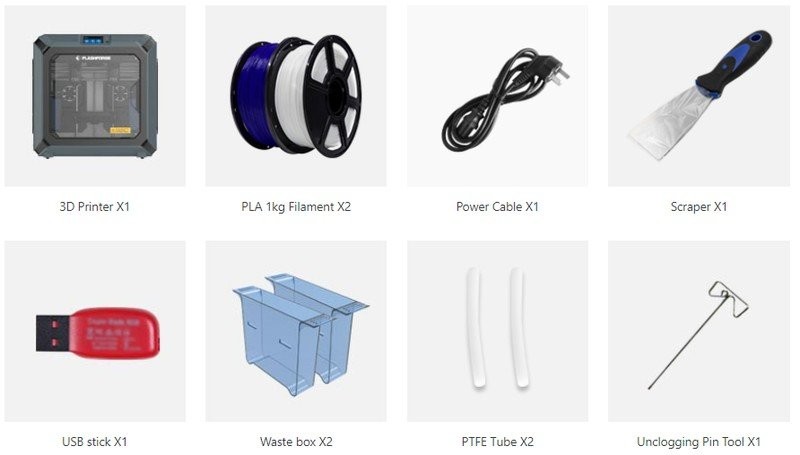
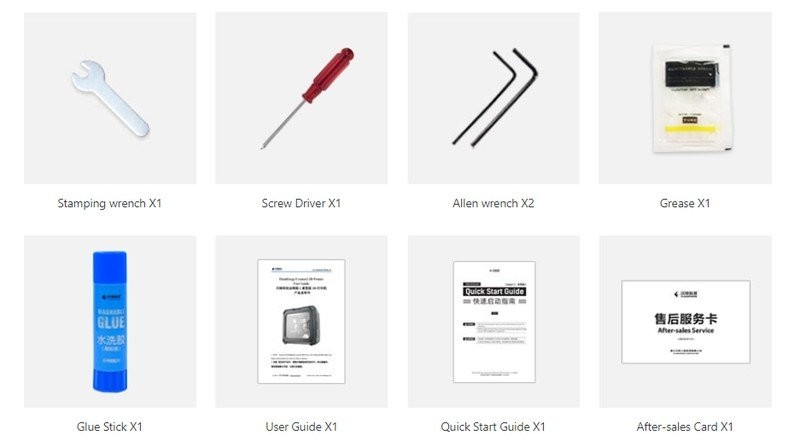
The manufacturer made sure that you have everything you need for immediate printing. Apart from the fully assembled printer, you will get:
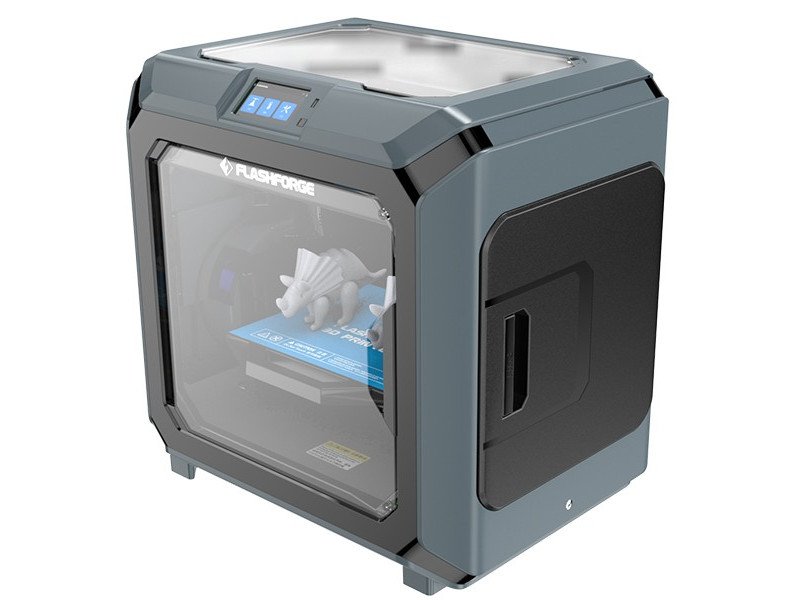
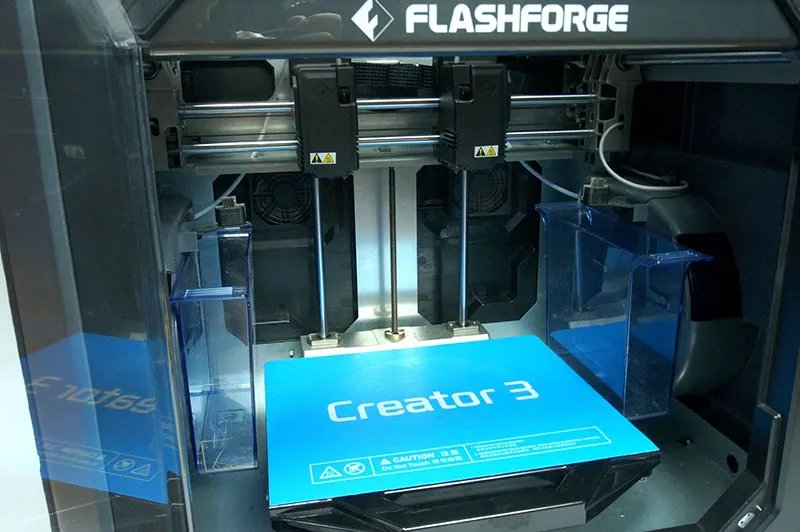
The outer dimensions of the Flashforge Creator 3 are 627 x 485 x 615 mm. The exterior of the printer is lined with gray and black plastic.
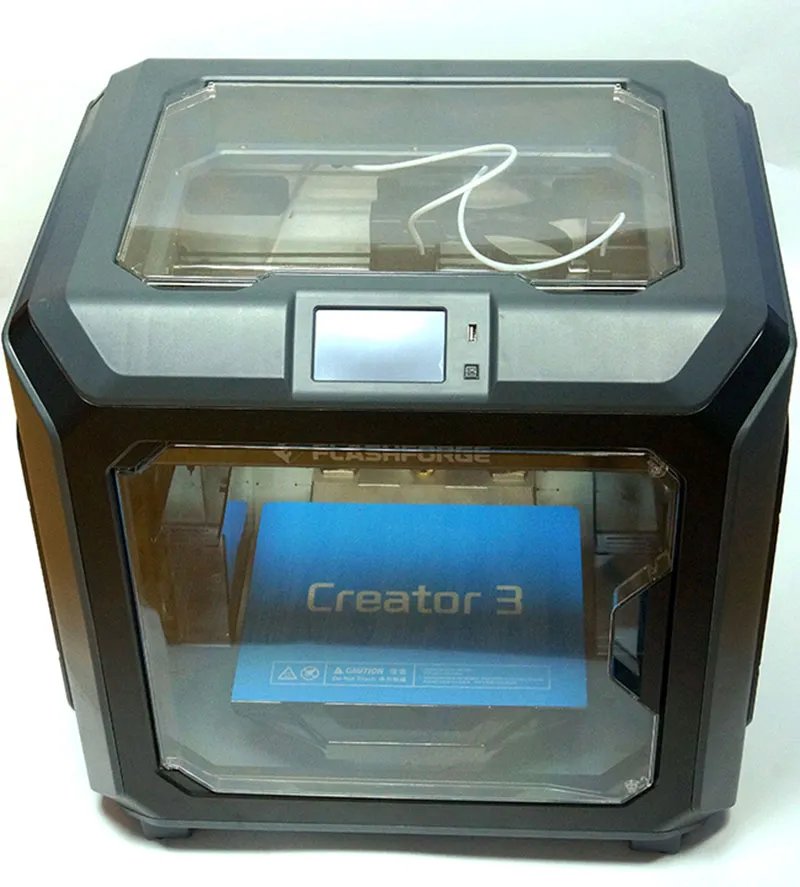
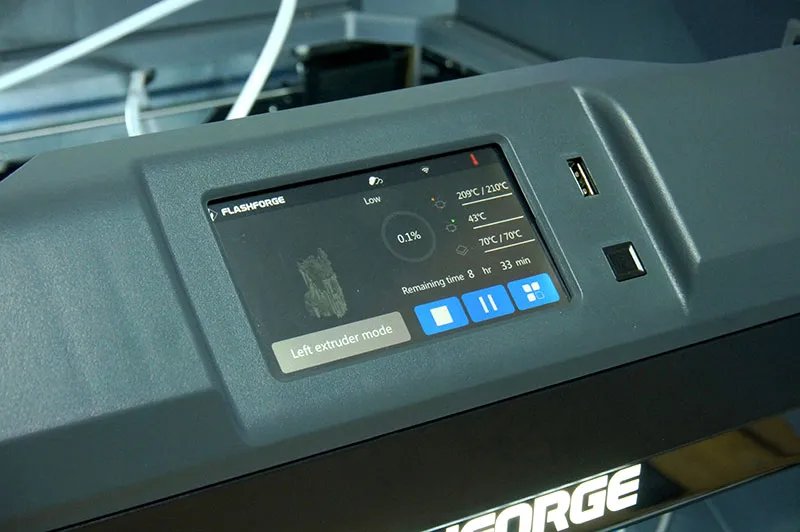
The front top panel features an LCD touch screen and a USB-flash drive port.
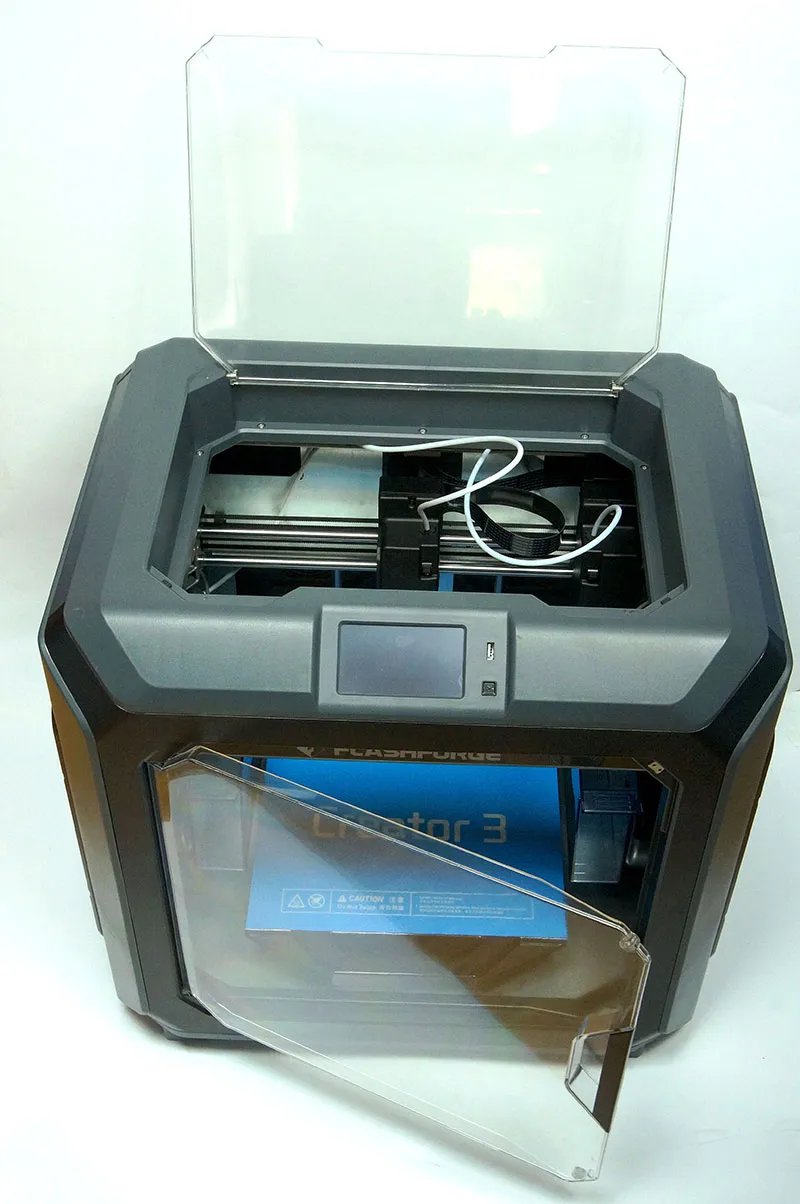
There are transparent plastic doors on the front and top sides of the device. When printing materials prone to shrink, such as ABS or nylon, the closed doors retain heat in the chamber. As for printing PLA, you can open the doors to release the heat and keep your part from overheating.
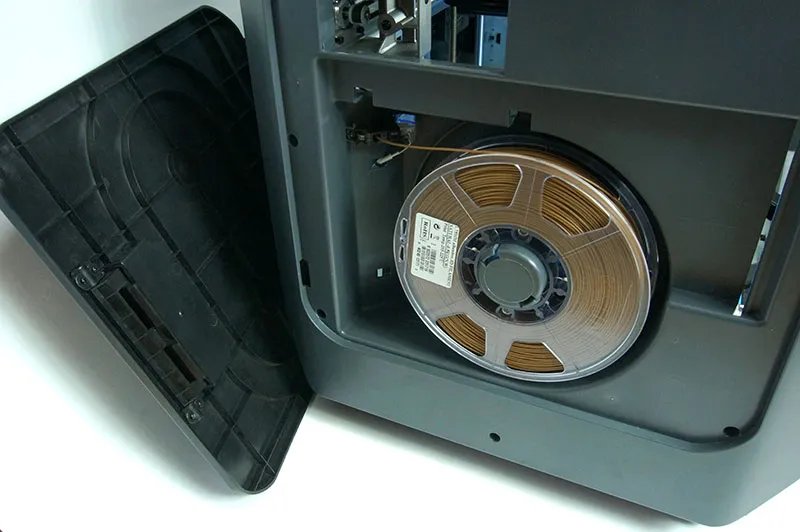
There are covers on both sides of the printer that reveal the filament compartments.
On the back is a power cord connector, a switch button, an RJ-45 port for Ethernet connectivity, and two exhaust fans with filters.
The printer enclosure is quite durable and heavy, the device weighing 40 kg. Now, let’s take a look inside.
The frame is made entirely of steel. The whole structure is very rigid. Most of the mobile mechanisms are made of aluminum, with some plastic parts made by casting. The axles move on 12 mm shafts on quality linear bearings. No backlash or jamming is observed. The axes are parked without limit switches using stepper motor drivers.
The main feature of the Creator 3 is two independent direct extruders, each of which can move separately from the other along the X-axis. This provides interesting possibilities, such as printing two identical parts simultaneously (Duplicate mode), or printing a model with its precise mirrored copy (Mirror mode).
The extruder hotends are all-metal with steel nozzles. They can easily heat up to 300 ℃, allowing the machine to print in a wide range of filaments.
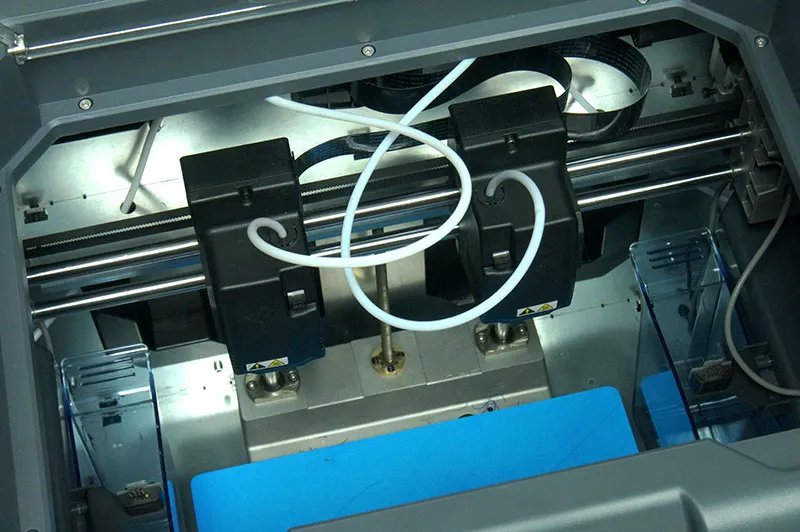
Each extruder has special nozzle cleaning brushes on the right and left. Underneath, there are plastic compartments for material residue that is brushed off in the process.
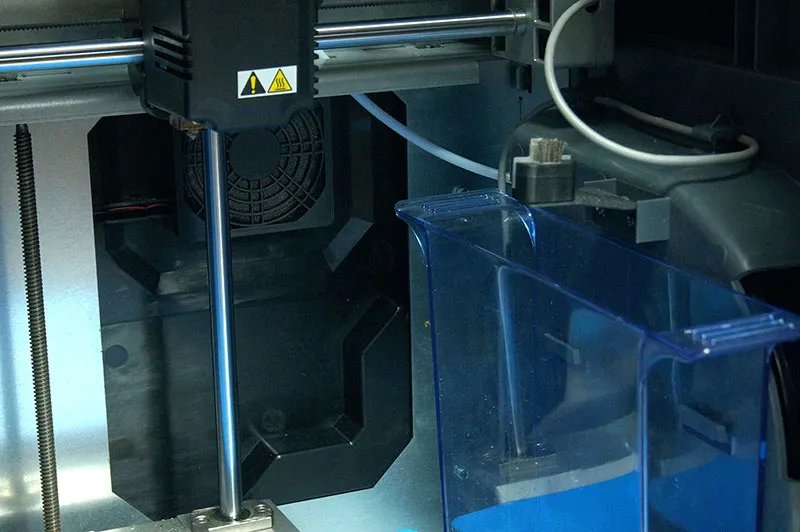
The build volume is quite large at 300 x 250 x 200 mm. The printer’s bed is flexible and detachable, making it easy to remove big models from the platform. It is fixed to the frame with multiple slide fasteners.
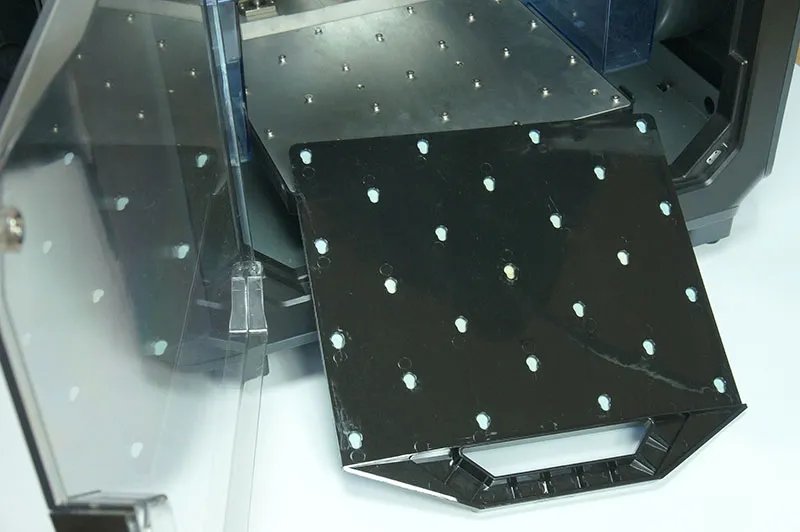
The bed has a special surface similar to BuildTak, which provides decent adhesion. Still, it is recommended to use an additional adhesive, such as a glue stick. The maximum bed heating temperature is 120 ℃.
The calibration is performed in semi-automatic mode without using separate sensors. The touch is detected by magnets set into the bed. The printer measures at three points and shows on the screen how to rotate each thumbscrew. After the bed leveling, you need to calibrate the extruders. The Z-axis is defined automatically. For the X and Y, the machine prints the longitudinal and transverse bars respectively. If they don’t converge, it prompts you to change the offset for the extruders. The full calibration procedure takes about 10 minutes.
The proprietary FlashPrint slicer is used to prepare models for printing.

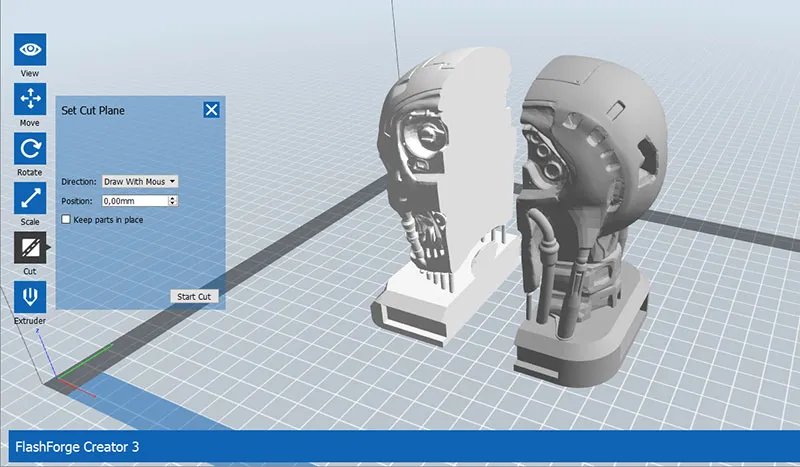
It has all the necessary functions and more. In addition to the basic features, such as moving, rotating, centering, and scaling models, there is a very handy function that allows you to cut models into parts, and the openings are automatically closed.
Also, FlashPrint will detect any errors in the loaded models and will suggest to automatically fix them.
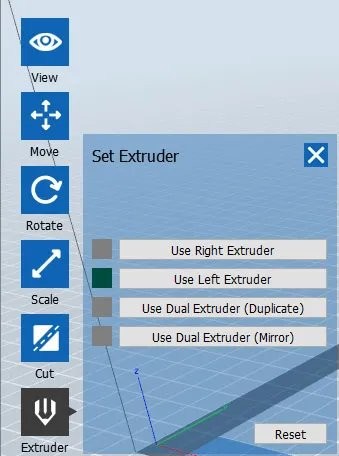
In the Extruder menu, you can choose the extruder to print the selected model with and select the Duplicate or Mirror mode.
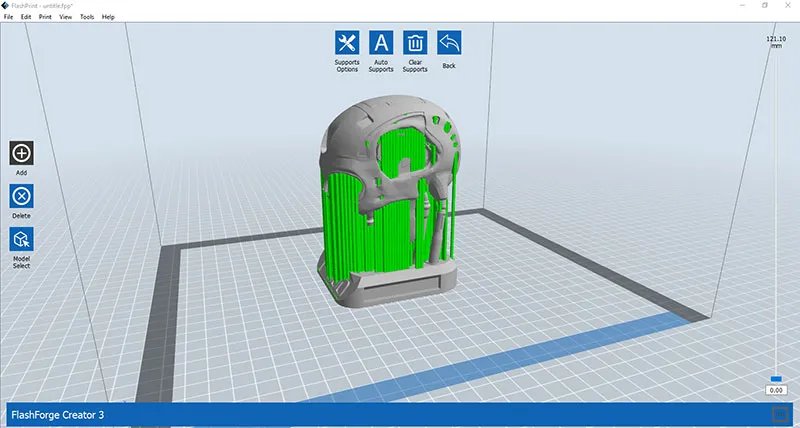
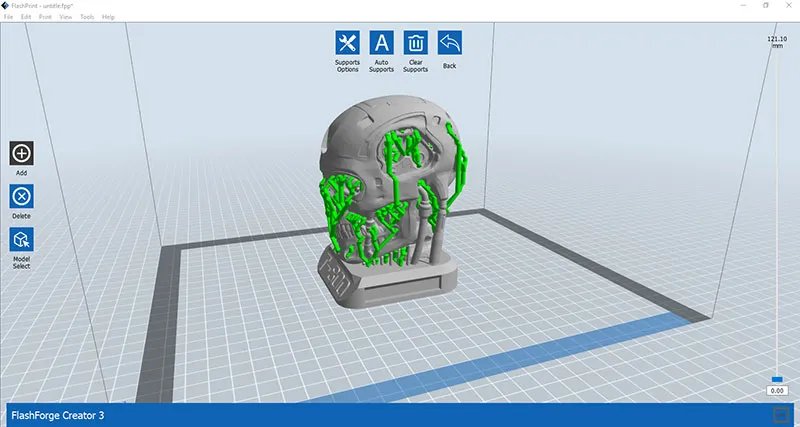
You can add supports either manually or automatically via preset parameters. The machine offers ordinary linear supports as well as tree-like ones.
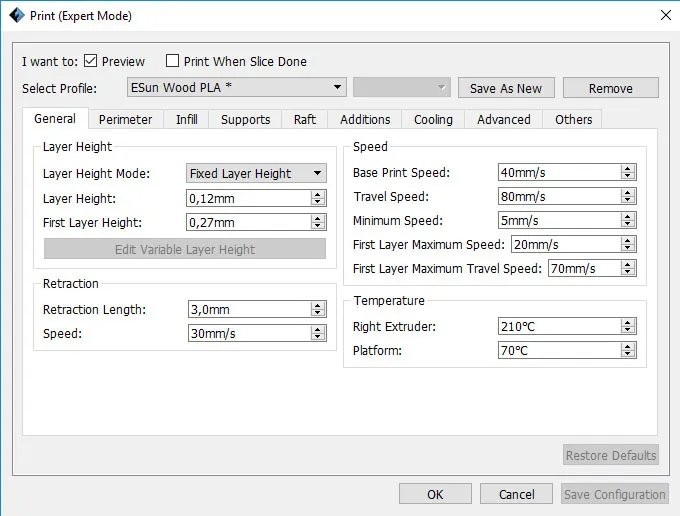
For slicing settings, there are two modes: Basic and Expert. In the Basic mode, you can choose the type of material and the most basic parameters, the rest will be set by the program.
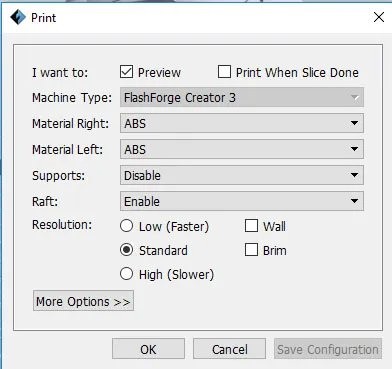
In the Expert mode, you can change any settings you need and create your own profiles for different filaments.
FlashPrint saves files in the GX format. They already have the embedded image of the model that will be displayed on the printer’s screen during printing and previewing. You can also use other slicers, for example, Cura, Simplify3D, Slic3r, etc. The printer reads G-codes files just fine, although they do not include visuals.
Prepared models can be sent to the printer from FlashPrint via Wi-Fi or a wired network. The printer has a built-in memory of 7 Gb. The only major drawback of the slicer is a slow preview. When printing large models, the slicing check will take quite a while
You can also control the Creator 3 via the FlashCloud web service. That requires registration at https://cloud.sz3dp.com. Connect the printer to the Internet using Wi-Fi or Ethernet, add it to your account, and that’s it.
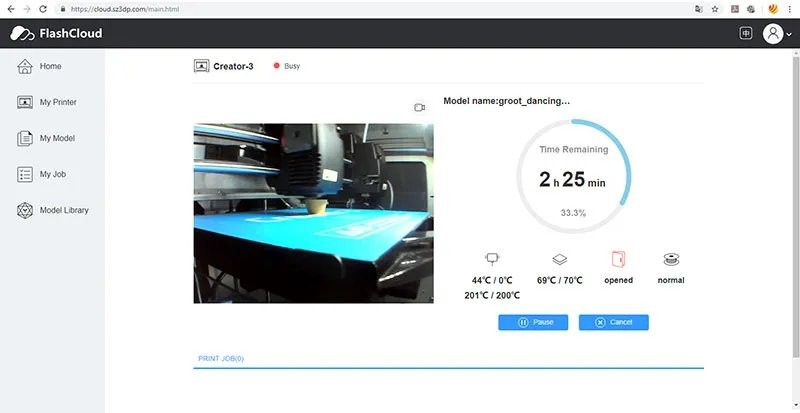
FlashCloud has a rather limited number of features. You can:
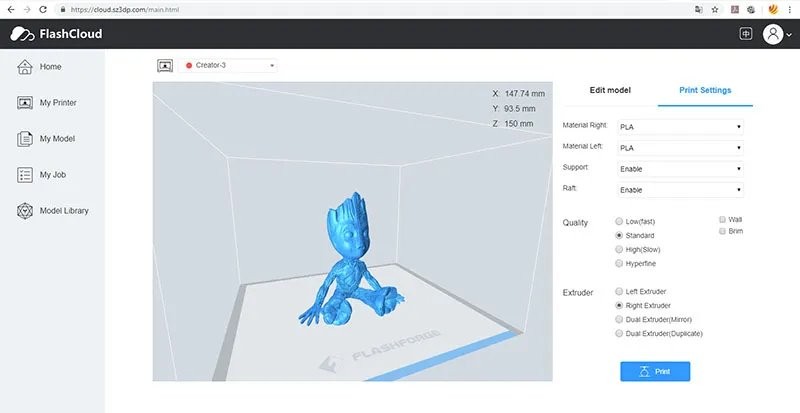
The print quality can be selected only with basic preset material types. It is possible to toggle rafts, supports, brims, and walls as well as select the extruder mode.
As an alternative to FlashCloud, a third-party service from Polar3d, PolarCloud, can also be used for remote control.
To challenge the versatility of the Creator 3, we made several tests with a wide variety of materials and printing modes. Let’s elaborate on our results.
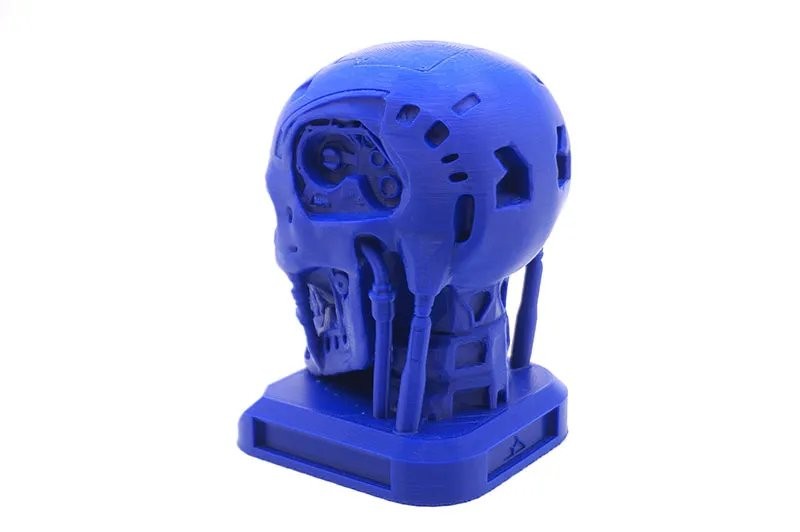
The first thing we tried to print with the Creator 3 was the T800 Terminator head. It was printed without supports. However, there were a few auxiliary posts near the jaw, already built into the model.
Filament: Tiger3D ABS Blue
Layer: 0.12 mm
Speed: 60 mm/s
Temperature: 235/110 ℃
Dimensions: 82 x 89 x 130 mm

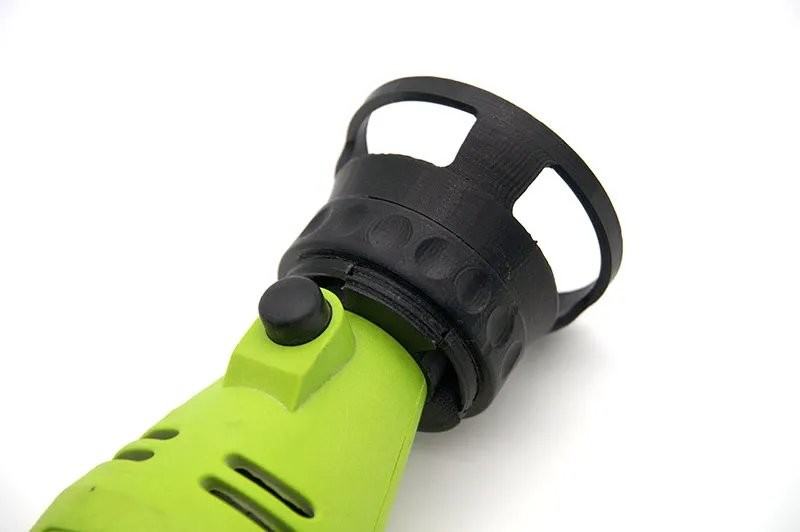
After that, we fed the Creator 3 with the Polymaker PolyMax PC (polycarbonate). This is a high-quality engineering material featuring high strength and impact/temperature resistance, with a softening point of 117 ℃. It is great for making functional models, electronics enclosures, and heat-resistant parts.
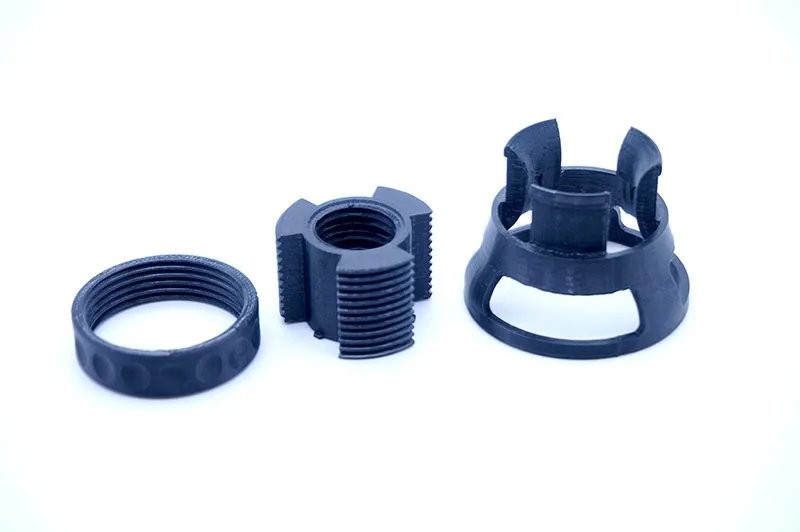
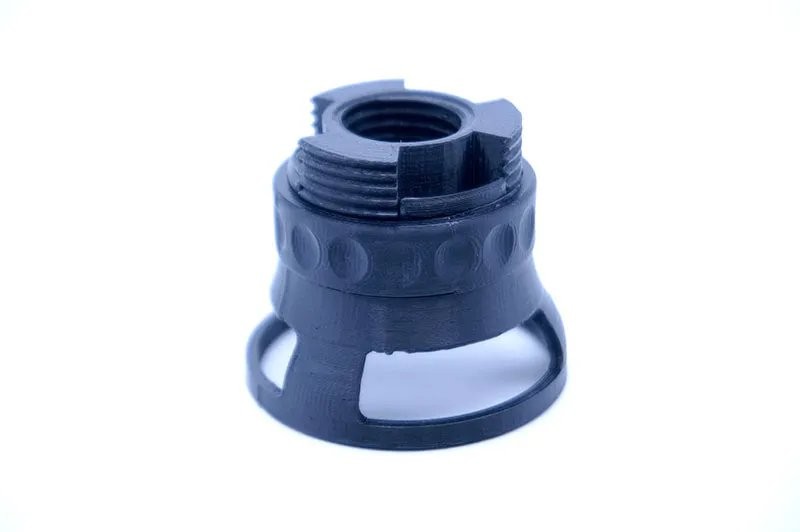
We started with a dremel attachment, allowing it to be conveniently used as a compact cutter.
Filament: Polymaker PolyMax PC Black
Layer: 0.18 mm
Speed: 60 mm/s
Temperature: 260/110 ℃
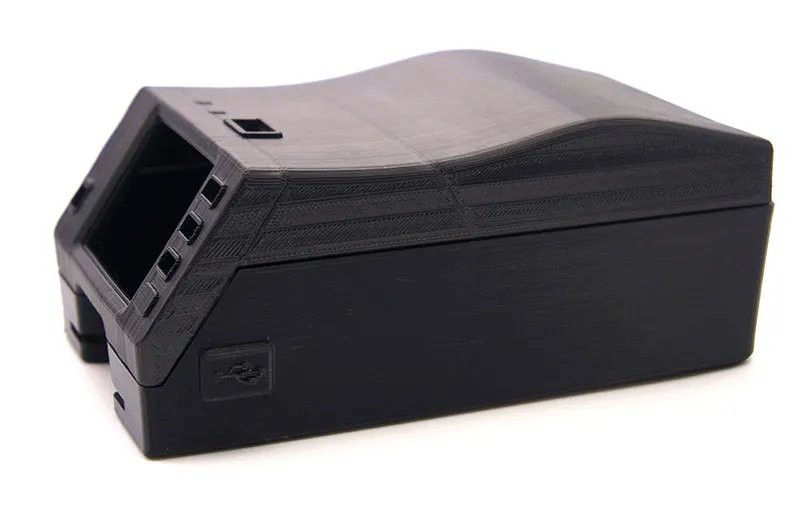
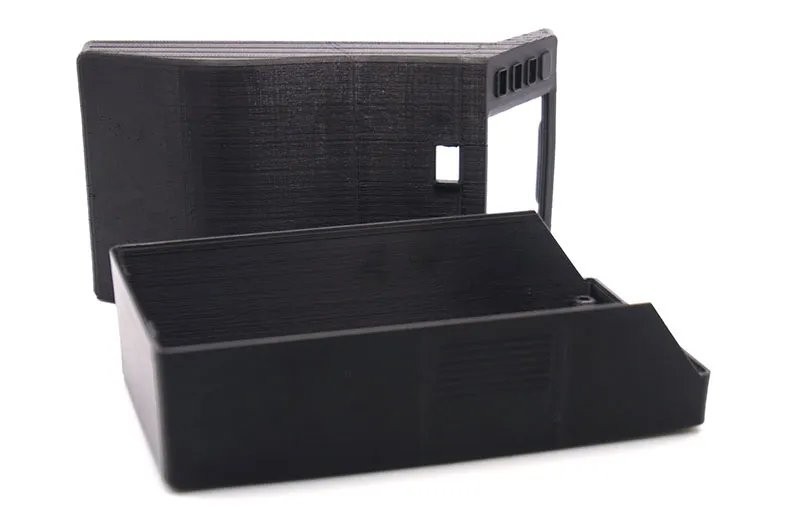
Then we printed a bigger control box body. It consists of two parts. The cover has curves on all sides and requires a lot of supports. The resulting case is not perfect, but it’s pretty good. The bottom part has a slightly bent corner due to the filament shrinkage.
Filament: Polymaker PolyMax PC Black
Layer: 0.12 mm
Speed: 60 mm/s
Temperature: 260/110 ℃
Dimensions: 155 x 86 x 67 mm
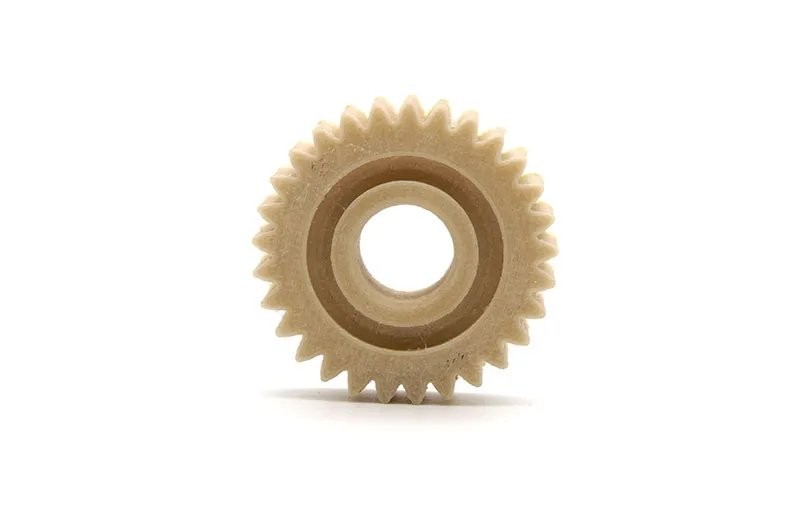
To test the operation of the Creator 3 at high temperatures, we printed a small gear with Polymaker N600GF25. It is fiberglass-filled nylon, an industrial filament with decent properties. It has a print temperature of 290–310 ℃. The Creator 3 handled this task easily.
Filament: Polymaker N600GF25 (Glassfiber) Natural
Layer: 0.12 mm
Speed: 30 mm/s
Temperature: 300/120 ℃
Dimensions: 36 x 26 x 9 mm

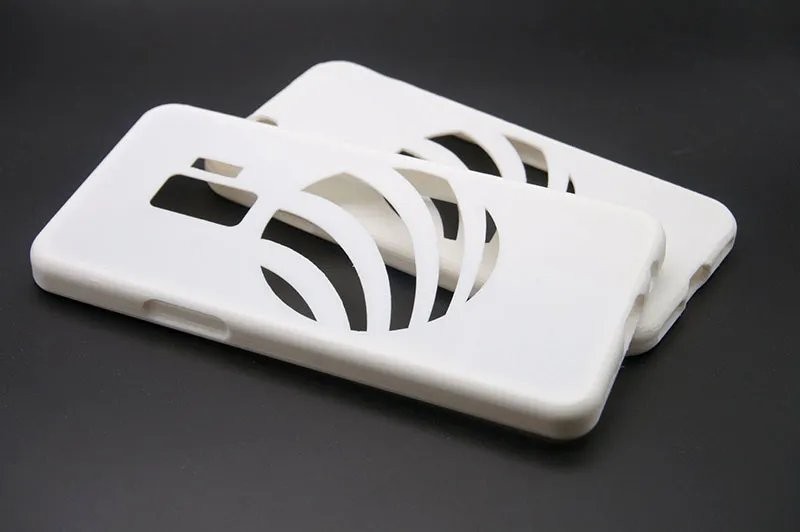
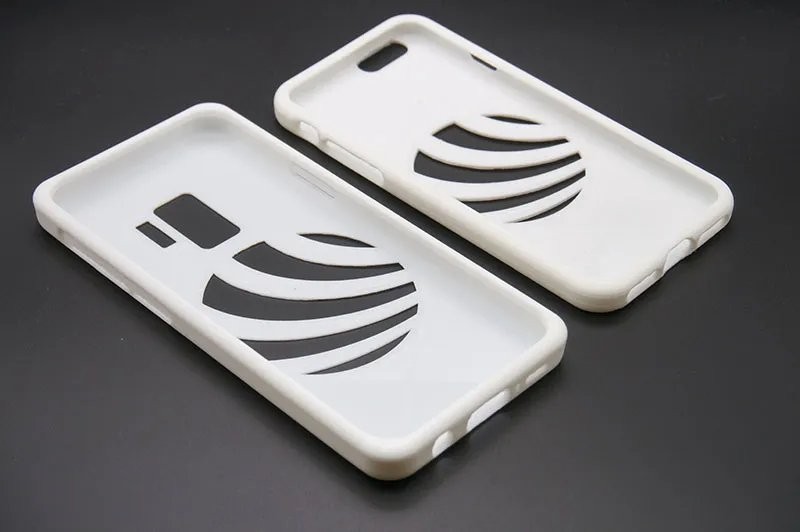
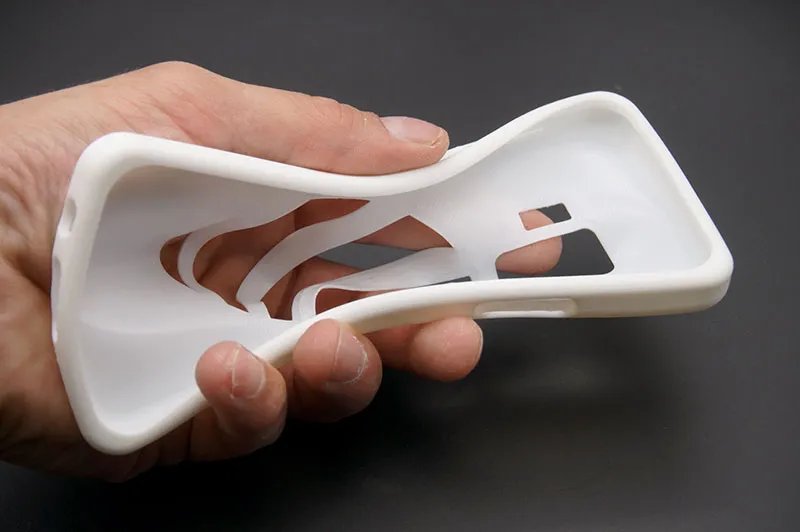
Since the printer is equipped with direct-type extruders (the feeder is right above the hotend), it is possible to safely print flexible plastics. To check this out, we made a couple of phone cases in Polymaker PolyFlex. It is a fairly soft material with a Shore hardness of 95A.
Filament: Polymaker PolyFlex White
Layer: 0.12 mm
Speed: 30 mm/s
Temperature: 220/70 ℃
Dimensions: 73 x 152 x 12 mm
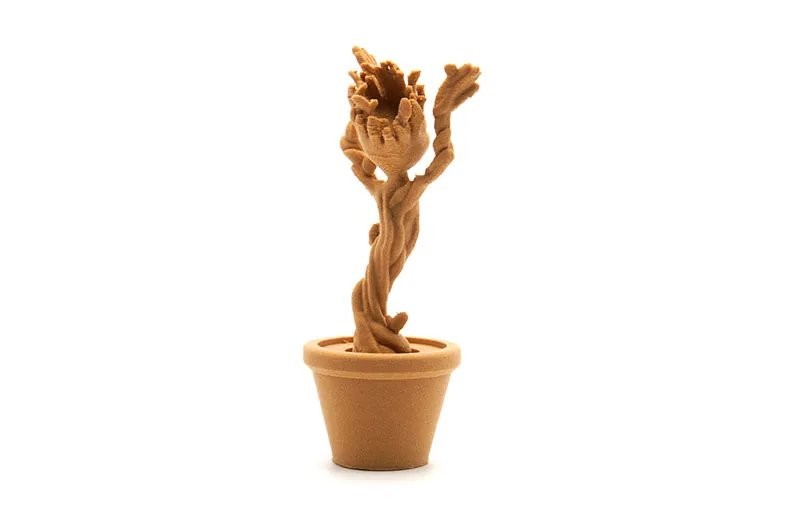
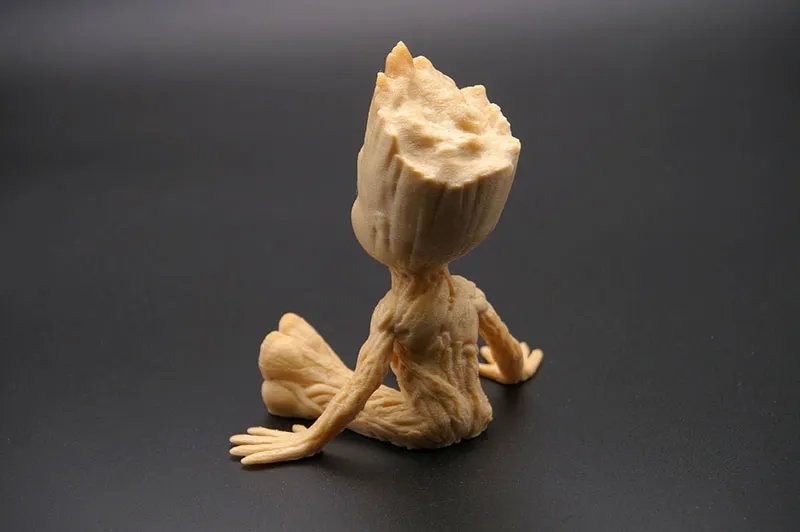
We also wanted to see how the Creator 3 would handle printing with wood-based composite filaments. With three different kinds of such plastic, we printed three “wooden” Groots of varying ages.
The smallest Groot was printed fine. The bottom part turned out just perfect. At the top, the model lost stability, which resulted in uneven hair. There was also quite a bit of stringing, but this happens to almost all wood plastics — tweaking the retraction and temperature settings will not help much. However, the strings can be easily removed with a knife.
Filament: Polymaker PolyWood PLA
Layer: 0.12 mm
Speed: 40 mm/s
Temperature: 205/70 ℃
Dimensions: 47 x 35 x 92 mm

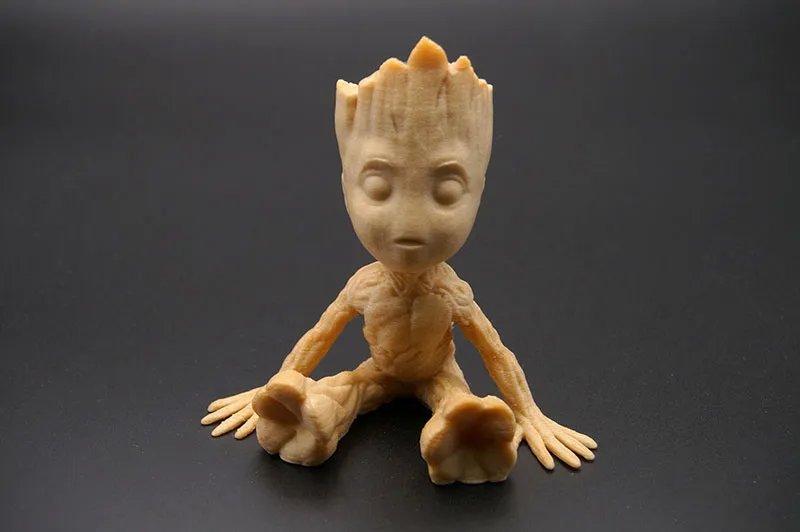
Next, we printed Little Groot with legs. He turned out well, though there were quite a few strings, too.
Filament: ESun Wood PLA Natural
Layer: 0.12 mm
Speed: 40 mm/s
Temperature: 200/70 ℃
Dimensions: 74 x 45 x 75 mm
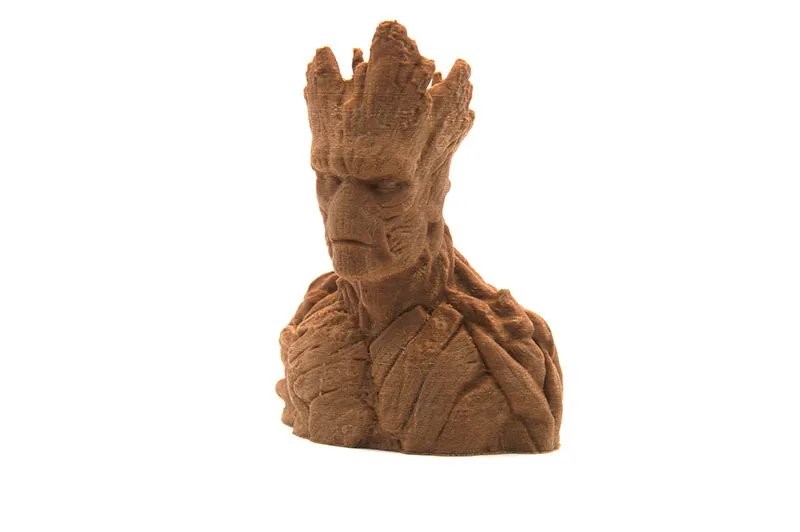
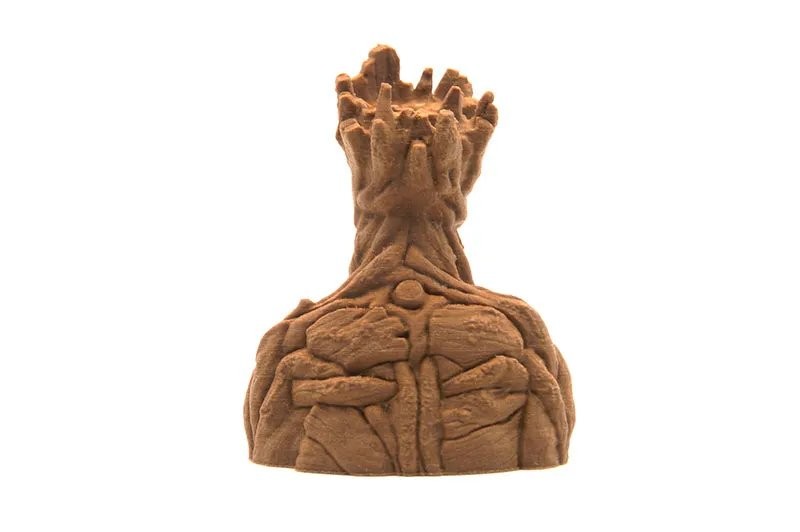
Finally, we came out with the adult Groot. It turned out worse. Despite the same layer height, you can observe uneven layering. It seems that unstable feeding is not the case with the Creator 3, so it is most likely an issue of the material itself.
Filament: ESun eBamboo PLA
Layer: 0.12 mm
Speed: 40 mm/s
Temperature: 210/70 ℃
Dimensions: 80 x 62 x 101 mm
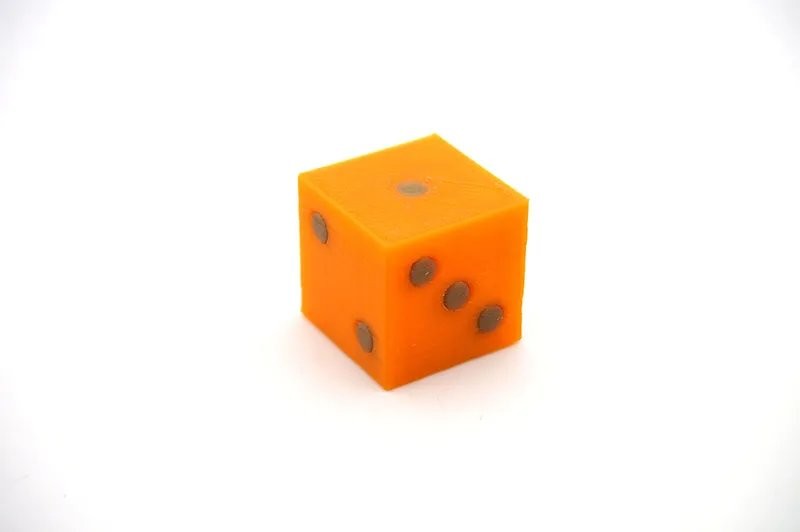
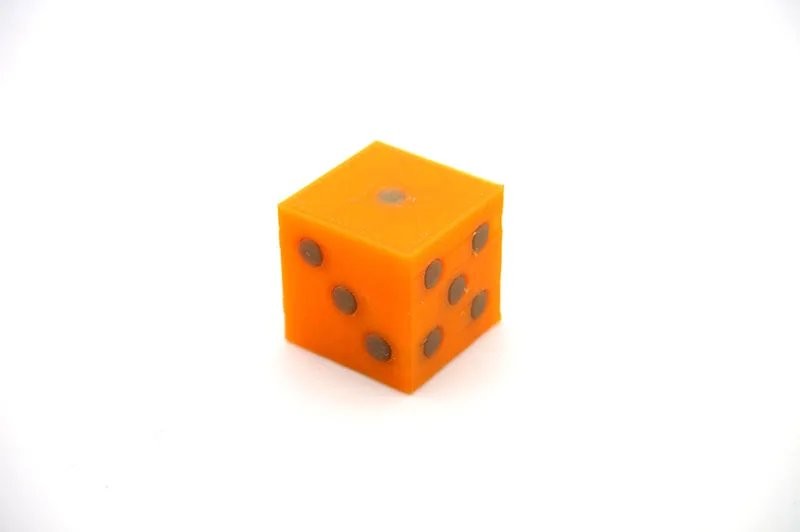
Next, it was time to test two-color printing. First, you need to calibrate the extruders in the X and Y axes. It is also advisable to use a wipe wall. When the extruder is idle, some plastic may leak out of the nozzle, but the wipe wall ensures even feeding when it comes to printing the model itself. For starters, we printed a dice.
Filament: Tiger3D PLA Orange / Tiger3D PLA Gold
Layer: 0.12 mm
Speed: 60 mm/s
Temperature: 205/205/70 ℃
Dimensions: 20 x 20 x 20 mm
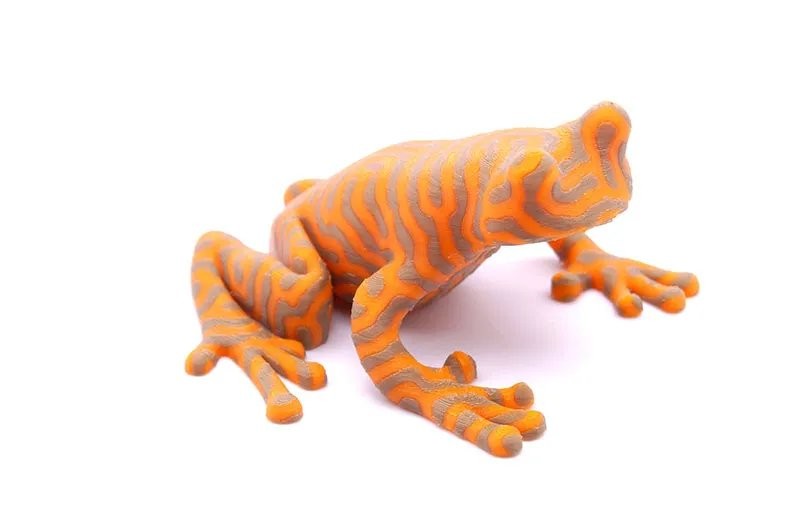
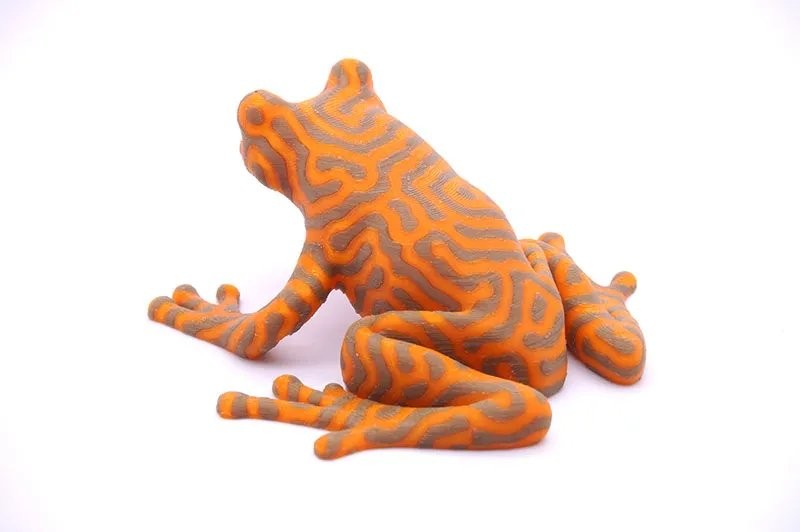
Right after that, we made a complex bicolor tree frog. It was printed without supports, on a raft, and with a wipe wall.
Filament: Tiger3D PLA Orange / Tiger3D PLA Gold
Layer: 0.12 mm
Speed: 60 mm/s
Temperature: 205/205/70 ℃
Dimensions: 114 x 101 x 52 mm
In addition to bicolor printing, two extruders can be useful for printing models with soluble supports. There are two main types of materials for this purpose. PVA is a water soluble plastic usually used in combination with PLA or a similar consumable requiring similar temperatures. HIPS can be dissolved with d-limonene and is usually combined with ABS or other high-temperature filaments.
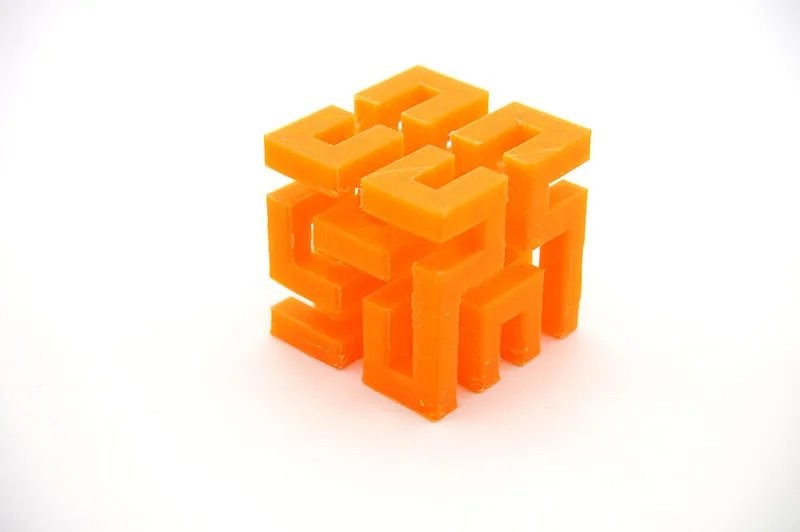
For one test we used PLA+PVA. This is the Hilbert Cube — the model impossible to print with a single extruder. With a dual extrusion system, you can print it in two colors. And if you print one of its parts with a soluble material, you can get a cube with a most interesting shape.
Filament: Tiger3D PLA Orange / ESun PVA Natural
Layer: 0.12 mm
Speed: 60 mm/s
Temperature: 205/190/70 ℃
Dimensions: 30 x 30 x 30 mm
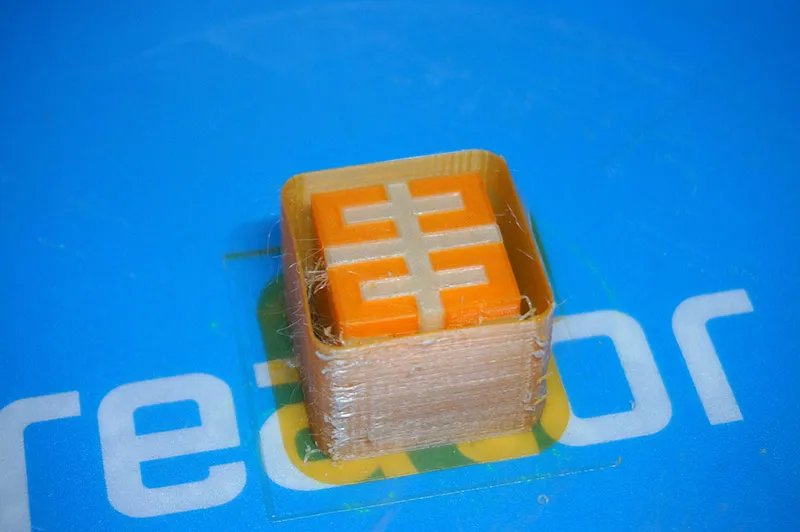
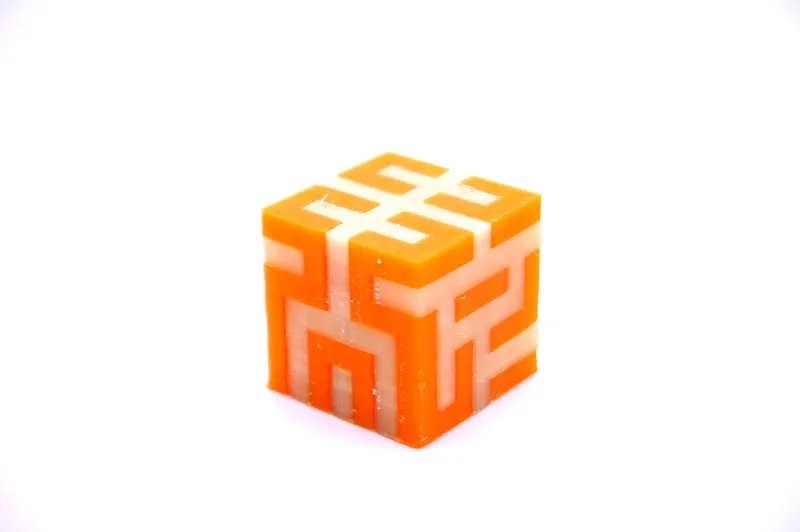
To dissolve the PVA plastic, put the model in a basin of warm water and wait a few hours. When the PVA becomes softer, you can easily remove it with ordinary tweezers and wash away with water.
The second test was devoted to the ABS+HIPS combination. The winding spring mechanism is usually printed in several parts. However, this version can be made as a whole with soluble supports.
Filament: Tiger3D ABS Blue / Esun HIPS Natural
Layer: 0.12 mm
Speed: 60 mm/s
Temperature: 235/240/120 ℃
Dimensions: 90 x 63 x 51 mm
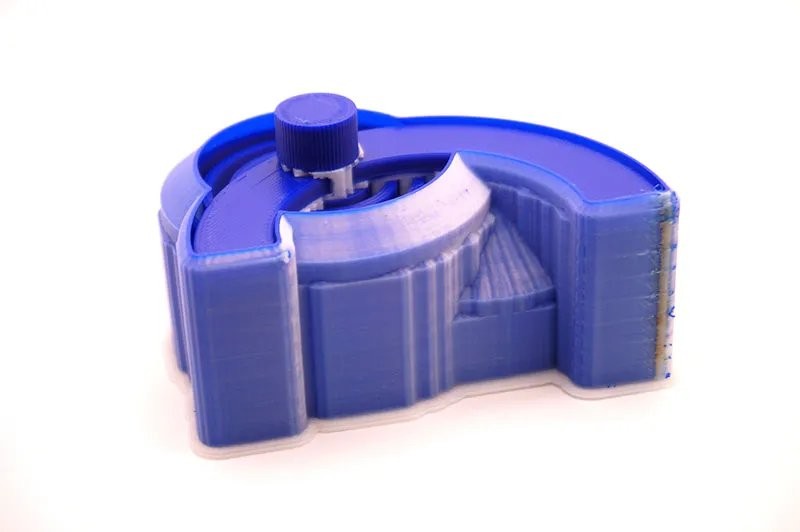
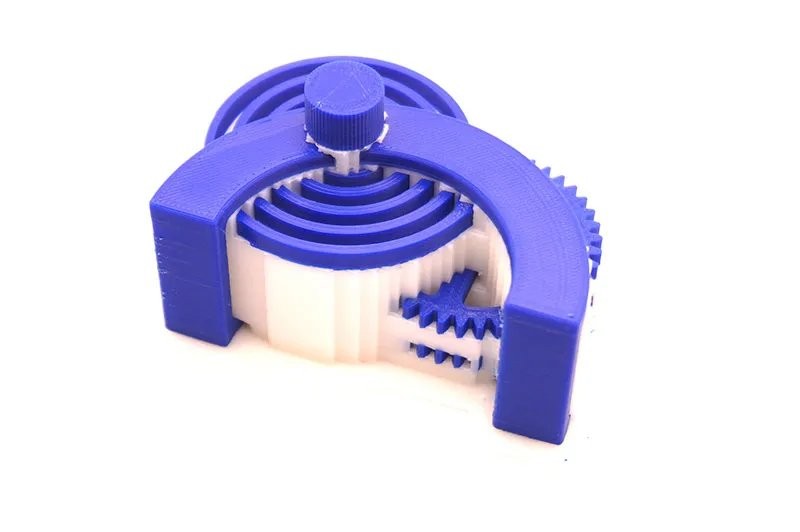
After printing, we broke off some of the supports with clippers to save some time. Then we put the mechanism into d-limonene. It took about a day for HIPS to dissolve.
It is recommended to rinse the part with d-limonene again after the supports dissolve. We didn’t do that, so a thin residue of dissolved HIPS can still be seen on the surface.
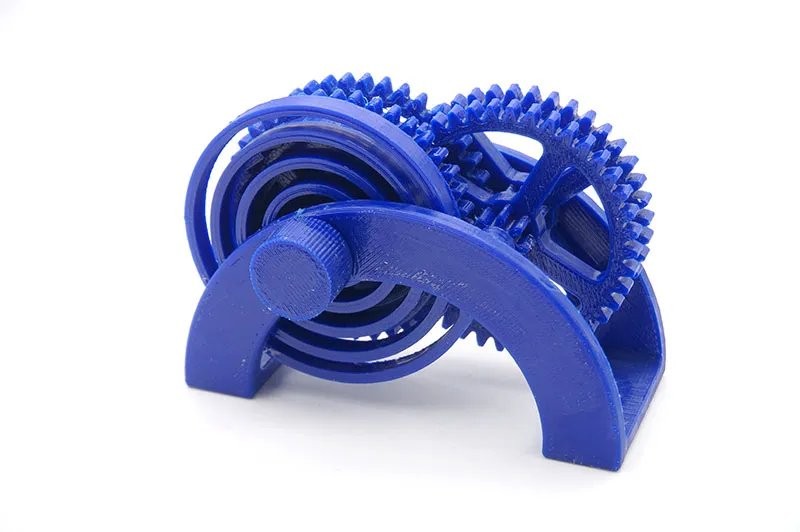
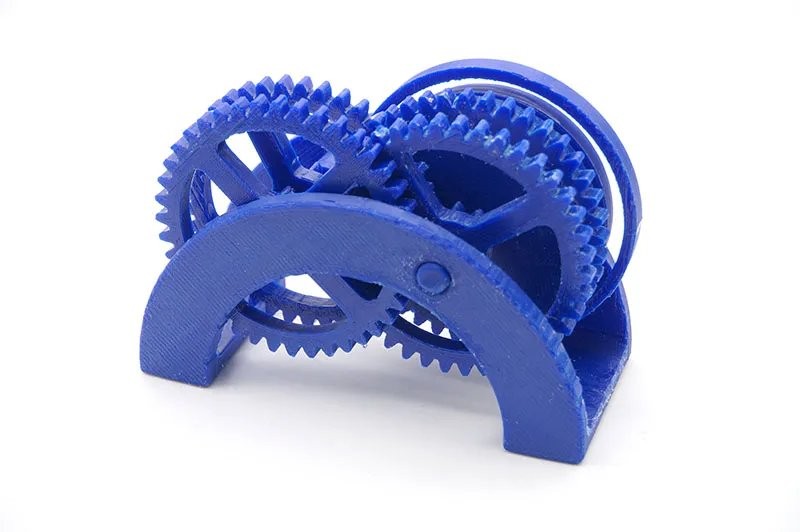
Unfortunately, the mechanism didn’t work. It is designed for printing with PLA plastic, and ABS is not a good choice for this task. The gears move, but the spring tension is not enough to set the whole mechanism in motion.
In any case, it is not the printer’s fault. Overall, it did a great job.
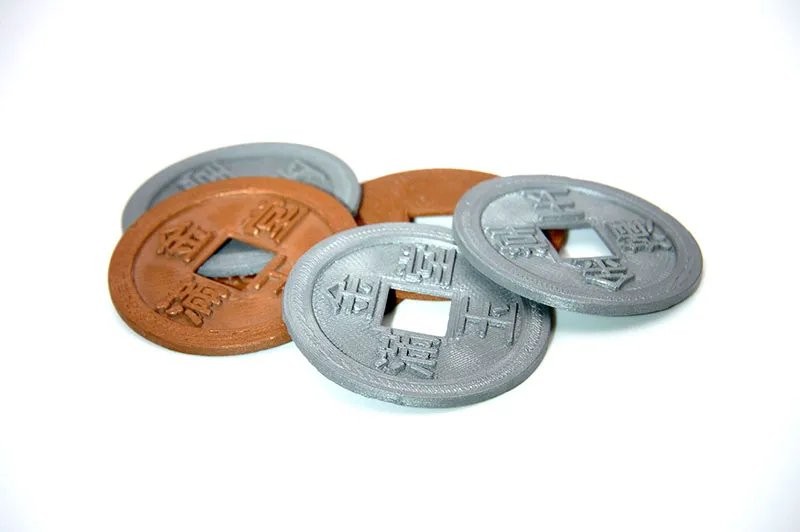
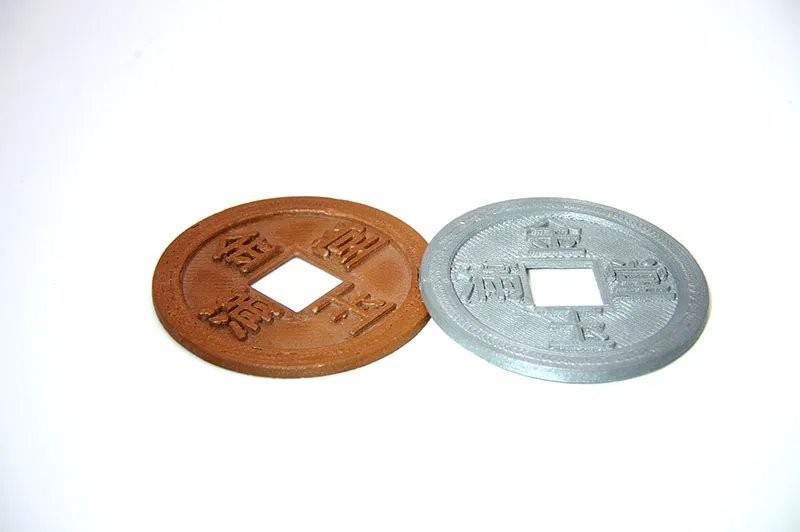
The last and perhaps the most important thing to check is dual extrusion printing. Let’s start with Duplicate mode, when two extruders simultaneously print the same part on different sides of the bed. We fed one extruder with copper-filled ESun eCopper PLA and the second with aluminum-filled ESun eAlfill to print two Chinese coins. These filaments acquire an interesting sheen, similar to real metal. All you need to do is to sand them down a bit after printing. So, we’ve got these fine, accurate coin models.
Filament: ESun eCopper PLA / ESun eAlfill PLA
Layer: 0.12 mm
Speed: 60 mm/s
Temperature: 205/205 ℃
Dimensions: 40 x 40 x 2 mm
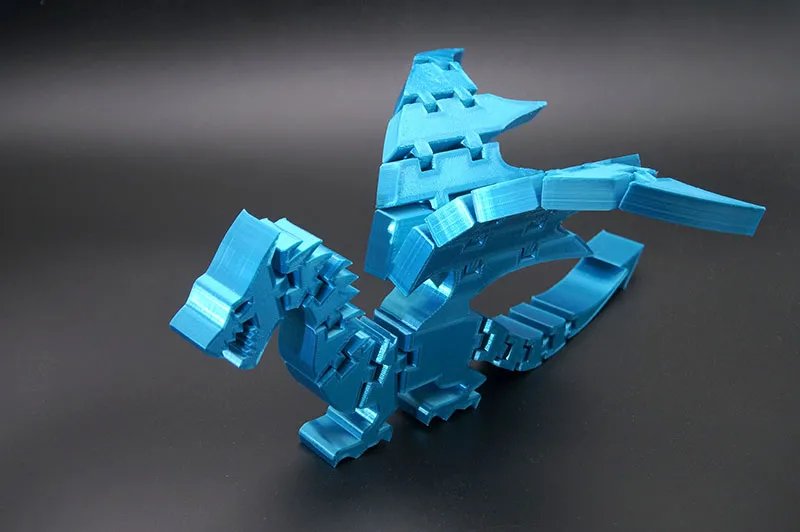
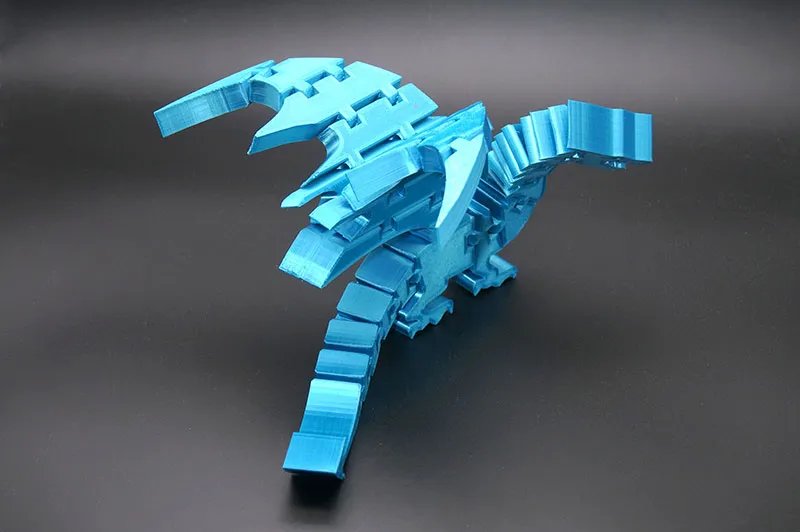
The second mode that makes use of the dual extrusion system is Mirror. As its name suggests, this mode, too, has two models printed simultaneously, but in a mirrored position. For example, we printed the Flexi Dragon model with ESun eSilk plastic that has a beautiful glitter in the light. Instead of printing the wings one at a time, we mirrored one of them. This way we got both wings at once in half the time.
Filament: Esun eSilk
Layer: 0.12 mm
Speed: 60 mm/s
Temperature: 200/70 ℃
Dimensions: 175 x 143 x 18 mm

After analyzing the users’ feedback, Flashforge decided to update the Creator series with a new updated version — the Creator 3 Pro. The machine brought the previous handy features to a higher level to cover more possible demands.

As expected, the Creator 3 Pro features high performance and versatility, boasting some improved aspects that are worth some extra hundred dollars.
Compared to its predecessor, the Creator 3 Pro heats up the print bed five times faster. It’s 3 minutes for the updated version versus 15 minutes for the Creator 3.
Unlike the original model, the Pro version has a quick-release hotend system. It is especially important when printing with carbon fiber filaments. When nozzles wear out faster, they naturally need to be replaced more often. The procedure is quick and simple for both removing, cleaning, and switching nozzles in all available modes.
Another nice bonus from the manufacturer. The 320 °C temperature (only 20 °C more) allows you to get a better result when printing with fiberglass plastics. The Creator 3 Pro provides a more stable result in comparison with the previous version.
The Creator 3 Pro expands on the idea of its predecessor with two independent extruders. The new model has sensors for precise leveling. This ensures faster calibration and better print results.
Printers with two independent extruders are a definite trend in the FDM market when it comes to industrial models. Nevertheless, Flashforge decided to offer a desktop version of such a machine.
The dual extrusion system provides new opportunities for printing in various plastics. Although some tweaking took place, our tests made it clear that the Creator 3 can cope with any challenge. The device impresses with its reliability, convenience, and ease of use — features it shares with the previous Flashforge models.
The Creator 3 will be a valuable asset for professional and personal use. It is great for confident printing of prototypes and functional parts with a wide range of materials.
Update your browser to view this website correctly. Update my browser now

![Flashforge Creator 3 3D Printer [Clearance]](https://top3dshop.com/image/cache/catalog/products/3d_printers/flashforge/creator_3/flashforge_creator_3_3d_printer_3-268x192.jpg)
Write a comment